
As the aroma of sizzling chicken fills my kitchen, I can’t help but feel a wave of excitement—there’s nothing quite like the joyful chaos of preparing a truly special meal. Today, it’s all about my favorite comfort food: Lemon Chicken Romano. This vibrant dish brings together succulent chicken breasts with a crunchy Romano cheese crust that’s simply irresistible. Best of all, it’s beginner-friendly and comes together in no time, making it a standout option for busy weeknight dinners or an elegant gathering. With just 15 minutes of prep and 30 minutes in the oven, this savory gem allows you to impress your family and friends without spending hours in the kitchen. So, are you ready to elevate your dinner game with a dash of lemony goodness?

Why is Lemon Chicken Romano a Must-Try?
Simplicity: The recipe is perfectly crafted for beginners, allowing you to whip up a dazzling meal without unnecessary fuss.
Savory Satisfaction: A harmonious blend of succulent chicken and a crispy Romano cheese crust brings comfort and joy to every bite.
Quick Prep Time: With only 15 minutes to prepare and 30 minutes to bake, this dish fits seamlessly into your busy schedule.
Versatile Pairings: Pair it with arugula salad or garlic butter bread for a full dining experience, ensuring every plate is picture-perfect.
Meal Appeal: Whether you’re hosting friends or treating yourself, this Lemon Chicken Romano is sure to impress and satisfy all.
Elevate your weeknight dinners and consider trying other delightful recipes like Greek Lemon Chicken or Lemon Butter Chicken to keep the citrus love flowing!
Lemon Chicken Romano Ingredients
For the Chicken
• Boneless Skinless Chicken Breasts – Serve as the tender base of the dish; ideal for absorbing flavors.
• Salt and Pepper – Enhance the natural flavor of the chicken; essential for a well-seasoned dish.
For the Coating
• All-Purpose Flour – Acts as a dredging medium, allowing the egg wash to adhere properly.
• Eggs – Create a sticky surface for the cheese crust; essential for binding cheese to the chicken.
• Romano Cheese – Provides a sharp, savory flavor and forms a crispy, golden crust; can substitute with Parmesan for a similar taste.
• Lemon Zest – Infuses the coating with bright, citrusy flavor and aroma; essential for the dish’s signature taste.
For Cooking
• Olive Oil and Butter – Important fats for frying the chicken; impart flavor and richness to the crust.
• Chicken Broth – Keeps the chicken moist during baking and adds flavor to the sauce; use low-sodium for lightness.
• Lemon Juice – Adds acidity to balance the richness of the cheese; helps keep chicken moist during baking.
For Garnish
• Fresh Parsley – Adds a pop of color and herbal brightness as a garnish; enhances visual appeal.
• Lemon Slices (for garnish) – Enhance presentation; add extra citrus flavor if desired.
Ready to start cooking your delicious Lemon Chicken Romano? Let’s dive into creating this masterpiece!
Step‑by‑Step Instructions for Lemon Chicken Romano
Step 1: Preheat the Oven
Begin by preheating your oven to 350°F (175°C). This allows for consistent heat that will perfectly cook your Lemon Chicken Romano. While the oven is warming up, gather your ingredients and equipment, including a large ovenproof skillet and three shallow dishes for dredging.
Step 2: Season the Chicken
Take the boneless skinless chicken breasts and generously season them with salt and pepper on both sides. This step enhances the natural flavors of the chicken and is crucial for ensuring each bite of your Lemon Chicken Romano is deliciously satisfying.
Step 3: Set Up the Dredging Station
Prepare your dredging station by placing all-purpose flour in one dish, beaten eggs in a second dish, and a mix of Romano cheese and lemon zest in a third dish. This setup will help you efficiently coat the chicken, ensuring a crispy and flavorful crust.
Step 4: Dredge the Chicken
Carefully dredge each seasoned chicken breast in the flour, making sure to coat it evenly. Next, dip the chicken into the beaten eggs, allowing any excess to drip off. Finally, coat the chicken with the Romano cheese and lemon zest mixture, pressing the cheese onto the surface for a thicker crust.
Step 5: Heat the Skillet
Heat a combination of olive oil and butter in your ovenproof skillet over medium-high heat. This balance of fats adds flavor and ensures your chicken will get a beautifully golden crust. Once the oil is shimmering, it’s time to start searing the chicken.
Step 6: Sear the Chicken
Place the coated chicken breasts in the hot skillet and sear for about 2-3 minutes on each side, or until they achieve a lovely golden-brown color. This crispy surface not only looks appealing but also locks in the juices, making your Lemon Chicken Romano incredibly moist and savory.
Step 7: Add Broth and Lemon Juice
Once the chicken is seared, carefully pour chicken broth and lemon juice around the chicken in the skillet. This mixture will provide moisture during baking and elevate the dish’s bright flavors. Be cautious not to pour it directly onto the chicken, as you want to maintain the crust.
Step 8: Bake in the Oven
Transfer the skillet to your preheated oven and bake for 20-25 minutes. Keep an eye on the chicken; it’s done when the internal temperature reaches 165°F (75°C) and the cheese crust is bubbly and golden. This step allows the chicken to finish cooking while absorbing the broth and lemon flavors.
Step 9: Rest and Garnish
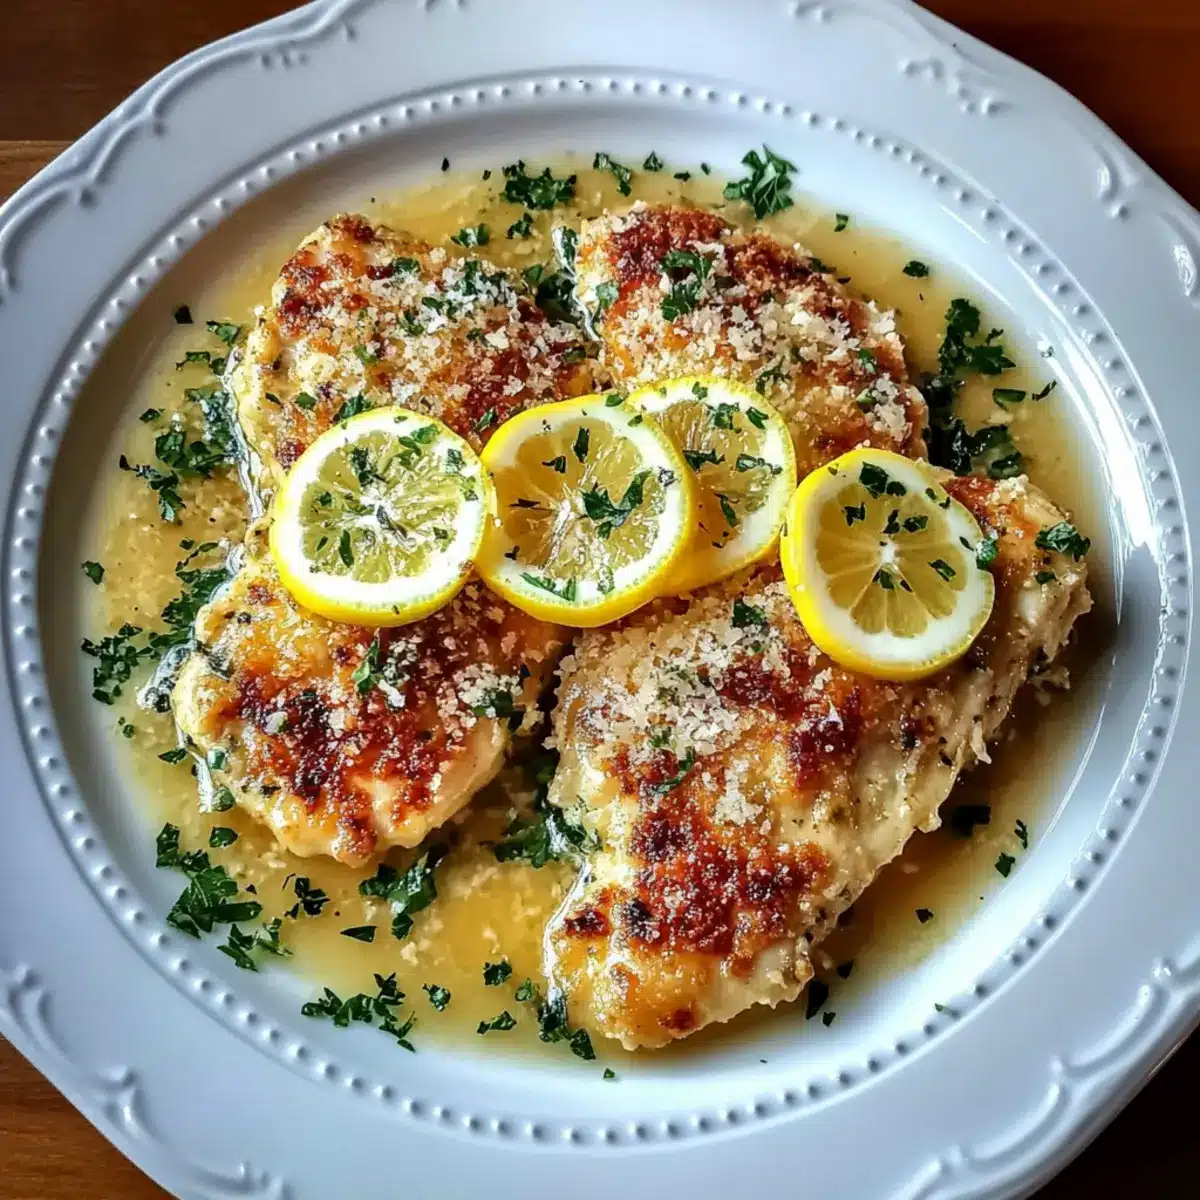
After baking, remove the skillet from the oven and let the chicken rest for a few minutes. This resting period allows the juices to redistribute for maximum tenderness. As a final touch, garnish with freshly chopped parsley and lemon slices to add color and extra zest to your Lemon Chicken Romano before serving.

Make Ahead Options
These Lemon Chicken Romano are perfect for meal prep enthusiasts! You can prep the chicken breasts by seasoning and dredging them up to 24 hours in advance, placing them on a parchment-lined baking sheet and refrigerating. This not only saves time but also allows the flavors to meld beautifully. For an even quicker option, you can also prepare the cheese and lemon zest mixture and store it in the fridge for up to 3 days. When you’re ready to serve, simply sear the chicken and follow the standard baking instructions. Just remember to keep the crust intact by pouring the broth and lemon juice around the chicken rather than directly on top—this keeps your delicious, crispy topping intact. Enjoy restaurant-quality results with minimal effort!
What to Serve with Lemon Chicken Romano
A vibrant meal deserves equally delightful accompaniments that enhance its flavors and textures, creating a truly memorable dining experience.
-
Garlic Butter Bread: This warm, toasty bread complements the crispy chicken beautifully, perfect for soaking up any leftover lemony juices.
-
Arugula Salad: A light salad with peppery arugula and a tangy lemon vinaigrette brightens the plate and balances the richness of the dish.
-
Roasted Asparagus: Tender asparagus spears, lightly seasoned, provide a fresh crunch that contrasts the creamy cheese crust of the chicken.
-
Lemon Rice: Fluffy rice infused with lemon zest and herbs serves as a delightful base to soak in the savory sauce, enhancing that citrus flavor.
-
Sautéed Spinach: Quick, sautéed spinach with garlic adds a nutritious green element that not only looks beautiful but also complements the meal’s savory notes.
-
Chardonnay: A chilled glass of buttery Chardonnay pairs perfectly, enhancing the dish’s flavors with its crisp acidity and subtle fruitiness.
-
Tiramisu: Finish off the meal with a classic Italian dessert like tiramisu. Its creamy, coffee-infused layers offer a delightful contrast to the tangy chicken.
Lemon Chicken Romano Variations & Substitutions
Feel free to play around with this recipe, adding your personal touch to create something special!
- Gluten-Free: Replace all-purpose flour with gluten-free flour for a suitable option without compromising flavor.
- Cheese Swap: Use Parmesan or Pecorino Romano instead of Romano cheese to create a unique tangy twist.
- Herb-Infused: Incorporate fresh herbs like thyme or basil into the cheese mixture for an aromatic boost that elevates every bite.
- Zestier Option: Adjust the amount of lemon zest and juice to amplify the citrus flavor, bringing a refreshing zing to your dish.
- Spicy Touch: Add a pinch of red pepper flakes to the cheese mixture for a gentle kick that complements the tanginess of the lemon.
- Mustard Glaze: Brush the chicken with a thin layer of Dijon mustard before dredging for an unexpected yet delightful flavor depth.
- Veggie Addition: Include sautéed spinach or sun-dried tomatoes in the skillet as the chicken bakes for extra color and nutrition.
- Crispy Topping: Sprinkle panko breadcrumbs on top of the cheese coating before baking for added crunch and texture, reminiscent of a gourmet dish.
Why not check out other delicious recipes like Sticky Garlic Chicken or Cowboy Butter Chicken for more inspiration?
How to Store and Freeze Lemon Chicken Romano
-
Fridge: Store cooled leftovers in an airtight container for up to 3 days. Reheat in the oven at 350°F (175°C) to maintain the crispy cheese crust.
-
Freezer: Wrap portions tightly in plastic wrap or aluminum foil, and place in a freezer-safe bag. Lemon Chicken Romano can be frozen for up to a month; thaw overnight in the fridge before reheating.
-
Reheating: For best results, reheat in the oven, covered with foil, to prevent drying out. Heat until warmed through and the crust becomes crisp again.
-
Leftover Tips: Use any leftover chicken in salads or as a filling for wraps for a quick, delicious lunch option.
Expert Tips for Lemon Chicken Romano
-
Even Coating: Ensure chicken is evenly coated by pressing the cheese mixture firmly onto the chicken for the best crust.
-
Searing Space: Don’t overcrowd the skillet while searing; this can lead to uneven cooking and soggy crusts.
-
Check Temperature: Use a meat thermometer to check for doneness without cutting into the chicken; it’s key for perfect Lemon Chicken Romano.
-
Flavor Boost: For extra flavor, consider marinating the chicken in lemon juice and herbs for an hour before cooking.
-
Broth Care: Pour the chicken broth and lemon juice carefully around the chicken—avoid pouring directly onto the crust to keep it crispy.

Lemon Chicken Romano Recipe FAQs
What type of chicken is best for Lemon Chicken Romano?
I recommend using boneless skinless chicken breasts as they absorb flavors beautifully and remain tender throughout the cooking process. If you prefer, you could also use chicken thighs for a slightly richer flavor!
How should I store leftover Lemon Chicken Romano?
Store your cooled leftovers in an airtight container in the fridge for up to 3 days. To reheat, place it in the oven at 350°F (175°C), which helps to maintain the crispy cheese crust. Just be sure to cover it with aluminum foil to prevent the chicken from drying out.
Can I freeze Lemon Chicken Romano?
Absolutely! You can freeze wrapped portions tightly in plastic wrap or aluminum foil and then place them in a freezer-safe bag for up to 1 month. When you’re ready to enjoy it again, thaw it overnight in the fridge before reheating in the oven.
What if my cheese crust isn’t crispy enough?
If you find that your cheese crust isn’t crispy after baking, try broiling it for a minute or two at the end, keeping a close eye on it! Also, ensure you pressed the cheese mixture firmly onto the chicken while coating to help it stick better.
Are there any dietary considerations for Lemon Chicken Romano?
Yes, this recipe can be made gluten-free! Just substitute regular all-purpose flour with a gluten-free flour blend. Always be sure to check the labels of your chicken broth and cheese, as some brands may contain gluten or allergens.
Savory Lemon Chicken Romano with a Crunchy Cheese Crust
Ingredients
Equipment
Method
- Preheat your oven to 350°F (175°C) and gather your ingredients.
- Season the chicken breasts with salt and pepper on both sides.
- Set up your dredging station with flour, beaten eggs, and a mix of cheese and lemon zest.
- Dredge each chicken breast in flour, then dip in eggs, and finally coat with the cheese mixture.
- Heat olive oil and butter in the skillet over medium-high heat.
- Sear the chicken breasts for 2-3 minutes on each side until golden brown.
- Pour chicken broth and lemon juice around the chicken in the skillet.
- Transfer the skillet to the oven and bake for 20-25 minutes.
- Let the chicken rest for a few minutes, then garnish with parsley and lemon slices before serving.
Leave a Reply