
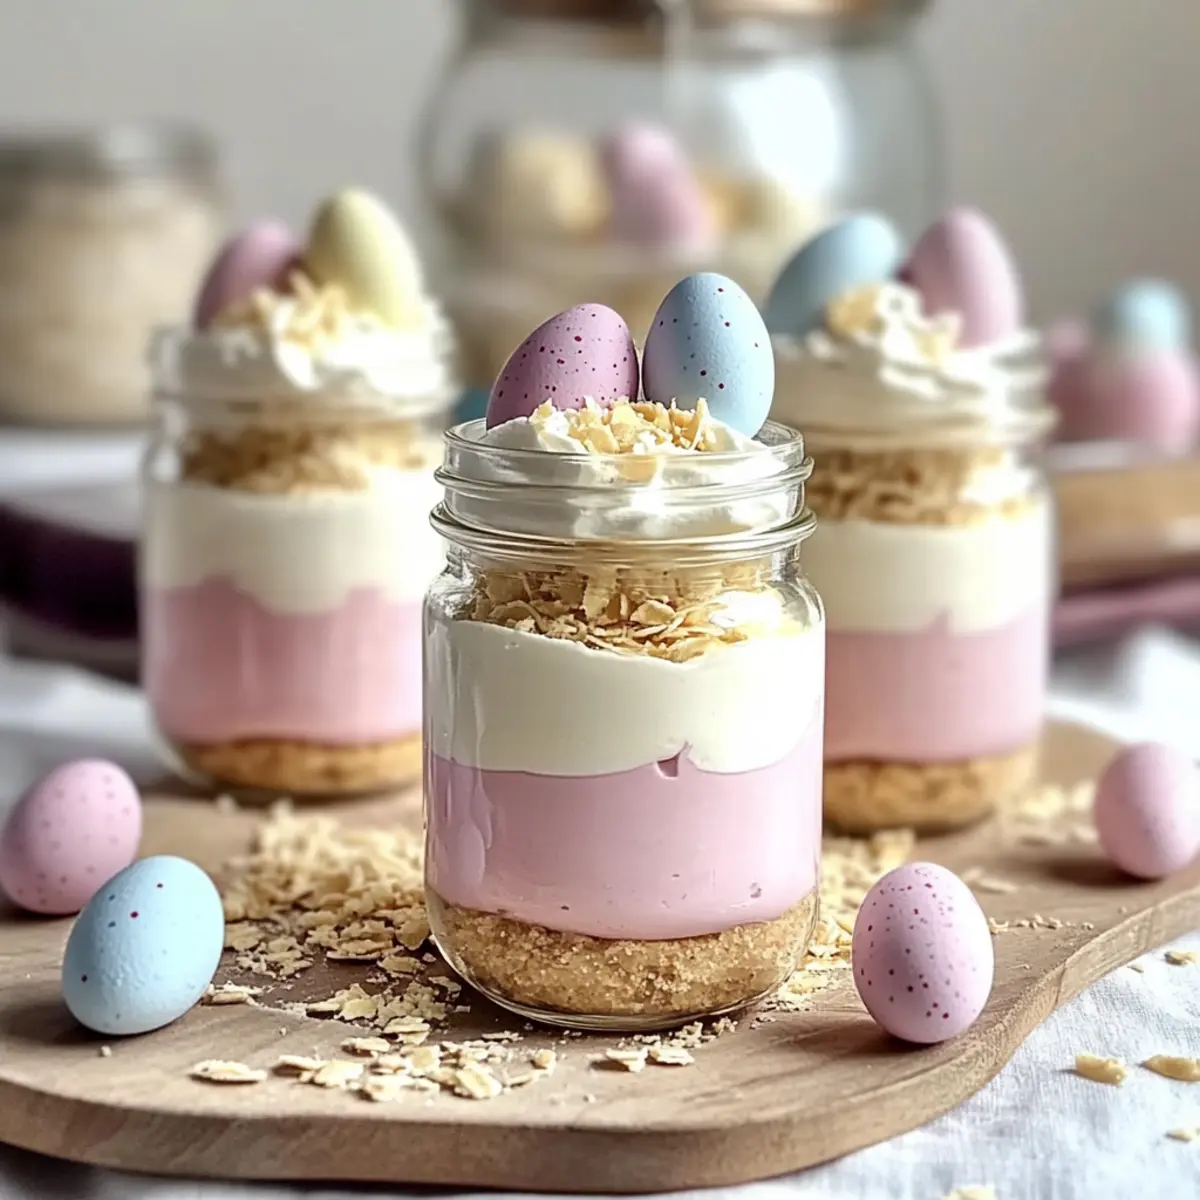
As I sat on my patio, basking in the warmth of spring, I couldn’t help but feel inspired by the vibrant season surrounding me. That’s when the idea of creating these delightful Easter Egg Cheesecake Jars sprang to life! This no-bake treat not only allows for customizable flavors and colors but also makes life easier with a quick prep time perfect for busy home chefs. Imagine wowing your family and friends with these charming desserts, each layered with creamy cheesecake and a satisfying graham cracker crust, all without the stress of baking. Plus, these jars are a delightful way to celebrate the holiday while accommodating dietary preferences with gluten-free options. Are you ready to bring a burst of color and flavor to your spring celebrations? Let’s dive into crafting these festive beauties!
Why Are Easter Egg Cheesecake Jars So Amazing?
Easy to Make: These no-bake Easter Egg Cheesecake Jars require minimal effort, letting you focus on enjoying the festivities rather than stressing over complicated recipes.
Customizable Options: Adapt the flavors and colors easily! Feel free to try out different fillings, or even swap in gluten-free ingredients to cater to your guests’ preferences.
Perfect for Spring: With their vibrant layers and festive decorations, these jars perfectly capture the essence of spring celebrations, making them a hit at any gathering.
Make Ahead Convenience: Prepare these delightful jars up to two days in advance, ensuring a hassle-free dessert that’s ready to impress your family or guests at a moment’s notice.
Crowd-Pleasing Appeal: The charming presentation and rich flavor are sure to leave everyone craving more—just like you’d find with the delicious Crisp Mini Cheesecakes.
Family Fun Activity: Let the kids get creative while decorating their jars with pastel candy eggs and sprinkles, making baking a fun and interactive experience for everyone!
Easter Egg Cheesecake Jars Ingredients
For the Crust
• Graham Cracker Crumbs – The base structure for the crust; consider crushed digestive biscuits for a twist.
• Granulated Sugar – Adds sweetness to the crust; brown sugar can deepen the flavor.
• Unsalted Butter – Binds the crust together; substitute with vegan butter or coconut oil for a dairy-free option.
For the Cheesecake Filling
• Cream Cheese – The star ingredient for a creamy filling; ensure it’s softened to avoid lumps.
• Powdered Sugar – Sweetens the cheesecake and creates smooth texture; use maple syrup for a natural alternative.
• Vanilla Extract – Enhances flavor; you can switch with vanilla bean paste or a hint of almond extract.
• Heavy Cream – Whipped to add lightness; keep it cold for stiff peaks.
Optional Color and Decoration
• Pink Gel Food Coloring or Freeze-Dried Strawberry Powder – Adds a pop of color; beet juice works for a natural touch.
• Whipped Cream – For topping these jars, adding creaminess and indulgence.
• Pastel Candy Eggs – Seasonal decorations, up to 3 per jar for a festive touch; mini chocolate eggs also make a great substitute.
• Rainbow or Pastel Sprinkles – Adds a playful and joyful element to finish.
Embrace the creativity and fun of making these Easter Egg Cheesecake Jars, as they offer a cheerful treat that will delight everyone at your spring gathering!
Step‑by‑Step Instructions for Easter Egg Cheesecake Jars
Step 1: Prepare the Crust
In a medium bowl, combine 1 cup of graham cracker crumbs, 2 tablespoons of granulated sugar, and 4 tablespoons of melted unsalted butter. Mix until the mixture resembles wet sand. Using a spoon or your fingers, press this crumbly mixture evenly into the bottom of mini jars, ensuring it’s packed tightly. Set aside while you prepare the cheesecake filling.
Step 2: Make the Cheesecake Filling
In a large mixing bowl, beat 8 ounces of softened cream cheese using an electric mixer on medium speed until smooth and creamy. Gradually add in 1 cup of powdered sugar and 1 teaspoon of vanilla extract, continuing to mix until fluffy and fully combined—this should take about 2-3 minutes. The filling should be thick yet smooth, ready to incorporate the whipped cream.
Step 3: Fold in Whipped Cream
In a separate bowl, whip 1 cup of heavy cream until stiff peaks form, usually around 3-5 minutes with an electric mixer on high speed. Gently fold this whipped cream into the cheesecake mixture using a spatula, being careful to maintain the airy texture. This step is crucial for achieving a light and fluffy filling for your Easter Egg Cheesecake Jars.
Step 4: Color the Filling (optional)
If you wish to create colorful layers, divide the cheesecake filling into two bowls. In one bowl, add a few drops of pink gel food coloring or 1 tablespoon of freeze-dried strawberry powder, mixing until evenly tinted. This adds a vibrant touch to your Easter Egg Cheesecake Jars, making them visually appealing and festive for the spring holiday.
Step 5: Layer the Jars
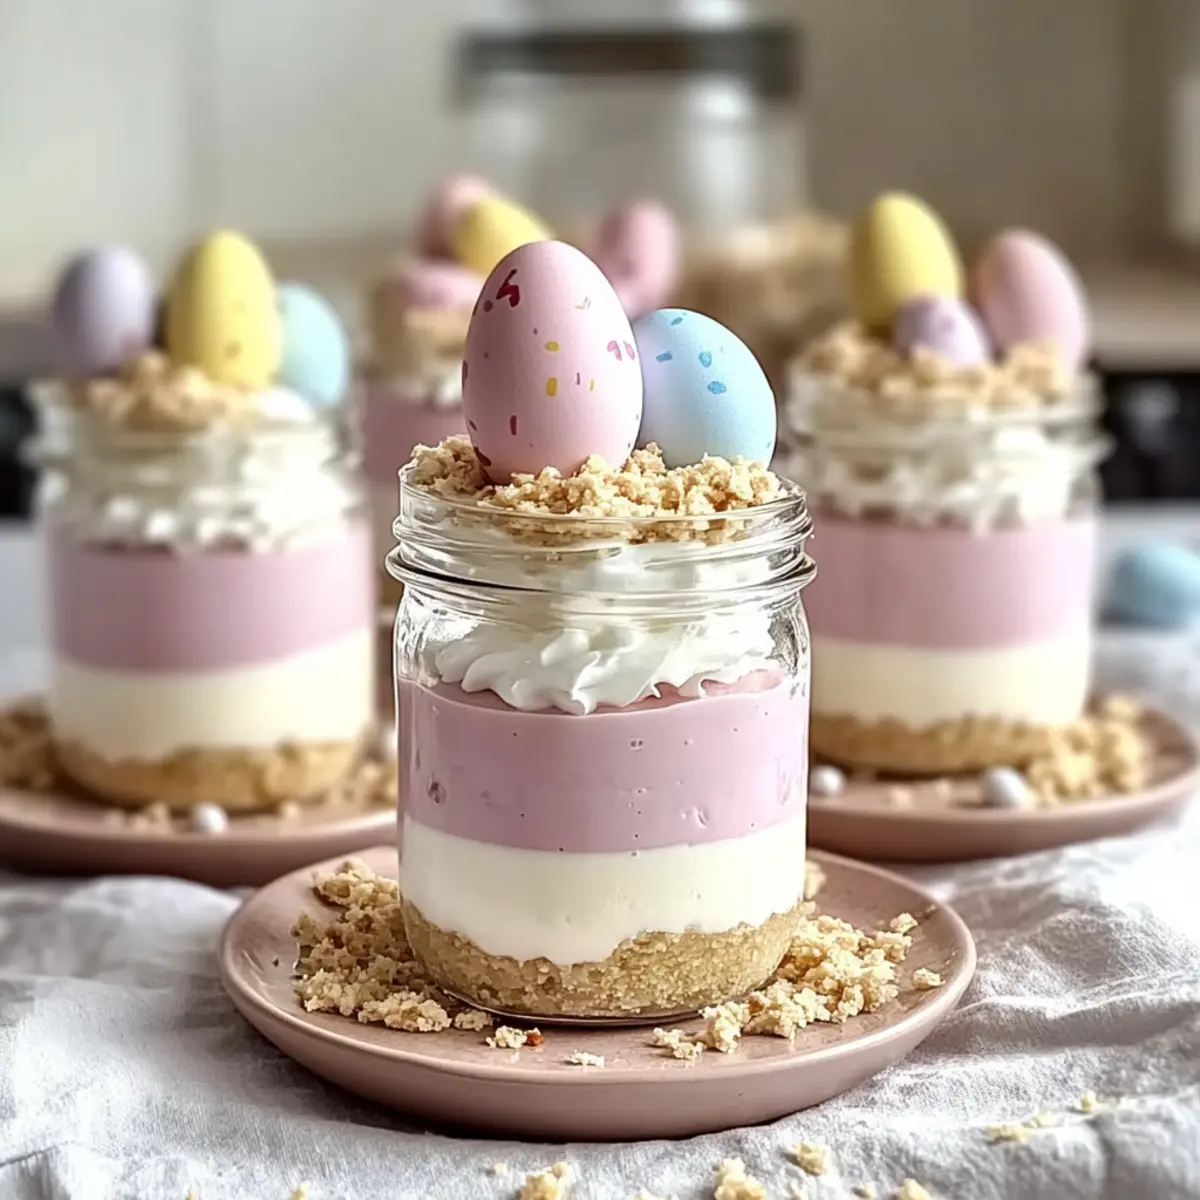
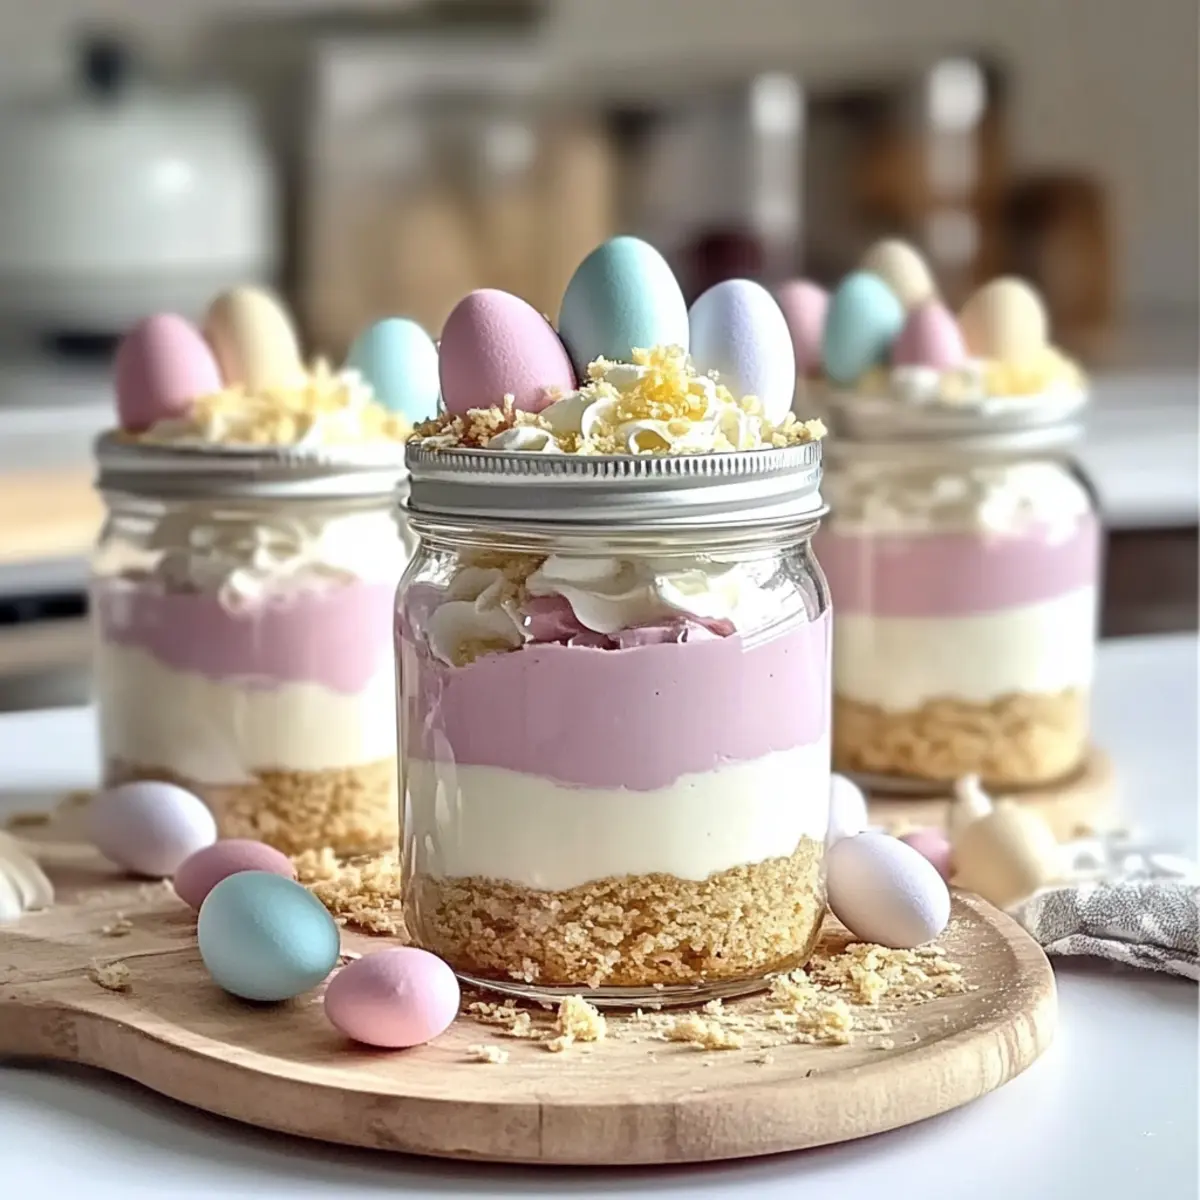
Using a piping bag or a spoon, carefully layer the cheesecake filling into each jar. Start with a spoonful of plain filling, followed by a spoonful of the colored filling, continuing to alternate colors for a beautiful layered effect. Fill the jars until you reach just below the rim, ensuring a satisfying look that invites your guests to dig in.
Step 6: Add Toppings
Once the jars are filled with cheesecake layers, it’s time to get creative! Swirl a generous dollop of whipped cream on top of each jar to enhance the indulgence. Finish off by decorating with 2-3 pastel candy eggs and a sprinkle of rainbow or pastel sprinkles to add a cheerful touch. This playful decoration makes your Easter Egg Cheesecake Jars truly festive.
Step 7: Chill and Serve
Refrigerate the filled jars for at least 2-3 hours, allowing the cheesecake to set before serving. This time in the fridge will enhance flavors and ensure the perfect texture for your creamy dessert. Once chilled, serve these delightful Easter Egg Cheesecake Jars to your family and friends—enjoy the smiles as they dive into this sweet spring treat!
Easter Egg Cheesecake Jars Variations
Feel free to embrace your creativity and make these treats your own with these delightful twists!
- Gluten-Free: Use gluten-free graham crackers or crushed almonds for the crust. Everyone can enjoy this festive dessert!
- Dairy-Free: Substitute cream cheese and heavy cream with plant-based alternatives for a vegan version. Your guests won’t miss the dairy!
- Chocolate Twist: Mix cocoa powder into the crust for a chocolatey graham cracker base. This rich flavor pairs beautifully with the cheesecake filling!
- Fruit Fusion: Incorporate fresh fruit purees, like strawberry or raspberry, into the cheesecake for a fruity burst of flavor. Imagine the deliciousness!
- Citrus Zing: Add lemon or lime zest to the filling for a refreshing citrus kick. It offers a delightful contrast to the sweetness of the cheesecake.
- Matcha Magic: Try using matcha powder in place of food coloring for a vibrant green layer and an earthy flavor. This unique twist will intrigue your guests!
- No-Bake Cheesecake Bites: Instead of jars, use mini silicone molds for bite-sized delights. Perfect for parties, and they make a great way to share!
- Spicy Surprise: Add a hint of cayenne pepper or chili powder to the chocolate version for an unexpected heat that will elevate the flavor profile.
And for more fun and creative desserts, don’t forget to check out these delicious options: Cheesecake Stuffed Strawberries and the mouthwatering Cookie Butter Cheesecake. Enjoy your baking adventure, and let your imagination soar!
Make Ahead Options
These Easter Egg Cheesecake Jars are a fantastic choice for meal prep, allowing you to save time during the busy holiday season! You can assemble the jars up to 2 days in advance without the toppings by placing the filled jars in the refrigerator. To maintain the jars’ quality and keep the graham cracker crust from becoming soggy, it’s best to add the whipped cream and candy decorations just before serving. When you’re ready to impress your guests, simply swirl on some freshly whipped cream and garnish with pastel candy eggs. This way, you’ll have a delightful, no-bake dessert that’s just as delicious and visually stunning as if you prepared it on the spot!
What to Serve with Easter Egg Cheesecake Jars
Create a delightful spring feast around these charming desserts, elevating your celebration with appetizing companions.
-
Fresh Berries: The light tartness of raspberries or strawberries adds a refreshing contrast to the creamy sweetness of the jars. Scatter them on the side for colorful presentation.
-
Lemonade Spritzers: A sparkling lemonade brings a bubbly zest to your gathering, perfectly balancing the richness of the cheesecakes with a light, fruity taste.
-
Mini Fruit Tarts: These offer a delightful crunch and a burst of fruit, echoing the vibrant colors of your cheesecake jars, while their buttery crusts provide a nice textural contrast.
-
Spring Salad: A light, mixed greens salad with citrus dressing enhances the meal by adding freshness and a hint of brightness, making your spread wholesome and vibrant.
-
Chocolate-Covered Strawberries: The indulgent and appealing chocolate pairs beautifully with the cheesecake’s creaminess, providing a lavish touch to your dessert table.
-
Sparkling Water: For a refreshing palate cleanser, serve sparkling water with lemon or mint, enhancing your guests’ enjoyment of the sweet layers in the jars.
-
Vanilla Ice Cream: A scoop of creamy vanilla ice cream can elevate your dessert experience, adding another layer of texture and flavor to complement the cheesecake jars.
-
Light White Wine: For adult guests, a chilled white wine offers a sophisticated pairing, adding a touch of elegance to your festive table while balancing the sweetness of the desserts.
Expert Tips for Easter Egg Cheesecake Jars
-
Soften Cream Cheese: Ensure cream cheese is completely softened to avoid lumps; this gives your filling a truly smooth texture.
-
Whip the Cream Skillfully: Whip heavy cream until stiff peaks form. Be careful not to overmix when folding it into the cheesecake mixture for airy layers.
-
Use a Piping Bag: For tidier, more appealing layers, use a piping bag to layer the cheesecake filling. This makes for a professional-looking presentation in your jars.
-
Chill Properly: Don’t skip the chilling step! Refrigerate the jars for at least 2-3 hours to allow the Easter Egg Cheesecake Jars to set and flavors to meld beautifully.
-
Experiment with Flavors: Don’t hesitate to try various flavor combinations or swap in gluten-free ingredients. It’s all about making these jars your own!
How to Store and Freeze Easter Egg Cheesecake Jars
Fridge: Keep assembled jars in the refrigerator for up to 3 days. Cover with plastic wrap or an airtight lid to maintain freshness.
Make-Ahead: You can prepare the cheesecake layers up to 2 days in advance. Store the filled jars without toppings in the fridge for easy assembly at your gathering.
Freezer: For longer storage, freeze assembled jars for up to 2 months. Wrap tightly in plastic wrap and then in aluminum foil to prevent freezer burn.
Thawing: To enjoy frozen Easter Egg Cheesecake Jars, transfer them to the fridge to thaw overnight. Add whipped cream and decorations just before serving to keep them looking fresh and festive.
Easter Egg Cheesecake Jars Recipe FAQs
How do I choose ripe ingredients for my cheesecake?
Absolutely! When selecting your cream cheese, look for tubs that are fresh and free of any lumps. For the whipped cream, ensure it’s cold before whipping to achieve those perfect stiff peaks. Always check the expiration date on each ingredient to ensure optimum freshness for your Easter Egg Cheesecake Jars.
How should I store my Easter Egg Cheesecake Jars?
To keep your delicious jars fresh, store them in the refrigerator for up to 3 days. Cover each jar with plastic wrap or a lid to prevent drying out and maintain that lovely creamy texture. If you make ahead, assemble the jars without toppings and add whipped cream just before serving.
Can I freeze Easter Egg Cheesecake Jars?
Yes, you can! For longer storage, tightly wrap each assembled jar in plastic wrap and then in aluminum foil to prevent freezer burn. You can freeze them for up to 2 months. Just remember to let them thaw in the refrigerator overnight before enjoying—this way, the texture remains delightful!
What should I do if my cheesecake filling is lumpy?
Very! Lumpy filling can be a bummer. To avoid this, ensure your cream cheese is fully softened before mixing. If you encounter lumps, you can blend the filling with a hand mixer until smooth, then slowly fold in the whipped cream. This should help restore that creamy, luscious texture!
Are there any dietary considerations I should be aware of?
Absolutely! If you’re catering to gluten-free diets, ensure that your graham cracker alternative is certified gluten-free. If allergies are a concern, you can substitute with dairy-free cream cheese and whipped cream options. Always check ingredient labels when using substitutions to keep everyone safe!
How can I make my Easter Egg Cheesecake Jars even more festive?
The more the merrier! Get creative with decorations by using a variety of toppings. Try mini chocolate eggs, fresh berries, or even edible flowers for added festive flair! You can also mix in different flavors, such as lemon zest or a chocolate layer, to wow your guests with beautiful, colorful creations.

Easter Egg Cheesecake Jars – A Fun No-Bake Treat!
Ingredients
Equipment
Method
- In a medium bowl, combine graham cracker crumbs, granulated sugar, and melted unsalted butter. Mix until the mixture resembles wet sand. Press evenly into the bottom of mini jars. Set aside.
- In a large mixing bowl, beat softened cream cheese until smooth and creamy. Gradually add in powdered sugar and vanilla extract, mixing until fluffy and fully combined.
- In a separate bowl, whip heavy cream until stiff peaks form. Gently fold this whipped cream into the cheesecake mixture.
- Optional: Divide the cheesecake filling into two bowls. Add food coloring or freeze-dried strawberry powder to one bowl and mix.
- Layer the cheesecake filling into each jar, alternating between plain and colored filling.
- Swirl whipped cream on top and decorate with pastel candy eggs and sprinkles.
- Refrigerate the filled jars for at least 2-3 hours before serving.
Leave a Reply