
The kitchen was filled with the warm, inviting aroma of pumpkin spice, a scent that instantly wrapped me in the coziness of fall. As I stirred together the ingredients for my Healthy Pumpkin Truffles, I couldn’t help but think about how these delightful treats make for the perfect guilt-free indulgence. Packed with flavor yet easy to whip up, these truffles deliver a healthy twist on those classic autumn flavors we all crave. Not only are they gluten-free and vegan, but the best part is that they require no baking at all! Just one bowl and a few simple ingredients bring them to life, making them an ideal choice for anyone wanting to swap out fast food for something nourishing and delicious. Are you ready to discover how simple it can be to make a dessert that’s both satisfying and good for you? Let’s dive into this delightful recipe!
Why Are These Truffles a Must-Try?
Decadently Healthy: These Healthy Pumpkin Truffles offer an indulgent taste without the guilt, making them perfect for satisfying your sweet tooth.
Quick and Easy: With just one bowl required, you can whip these up in no time, saving you precious moments in the kitchen.
No-Bake Delight: Say goodbye to lengthy baking times! These truffles come together effortlessly, allowing you to enjoy your treats without the hassle.
Versatile Flavors: Feel free to mix and match spices; consider experimenting with Healthy Almond Joys inspiration for a fun twist!
Crowd Pleaser: Whether for a fall gathering or a cozy night in, these truffles will charm everyone with their delightful pumpkin spice filling.
Feel Good Treat: Perfect for gluten-free or vegan diets, they provide a wholesome option to elevate your dessert game without sacrificing flavor!
Healthy Pumpkin Truffles Ingredients
For the Filling
- Pumpkin Purée – Adds moisture and a rich pumpkin flavor; use regular canned pumpkin, not pumpkin pie mix.
- Homemade Pumpkin Spice – Delivers a warm and aromatic blend of spices that echoes pumpkin pie; try making your own blend for a personal touch.
- Salt – Enhances the overall flavor of the truffles, balancing the sweetness.
- Liquid Stevia – A natural zero-calorie sweetener; feel free to adjust according to your sweetness preference. If you prefer, coconut sugar or brown sugar can be alternative sweeteners.
- Oat Flour – Acts as a binder and adds texture; can be substituted with other gluten-free flours except coconut flour.
For the Coating
- Dark Chocolate – Provides a rich coating that beautifully complements the pumpkin filling; use chocolate bars for a smoother melting experience.
- Flaky Sea Salt – Optional finishing touch that adds an exciting flavor contrast to the sweetness of the truffles.
These Healthy Pumpkin Truffles are not only a treat for the taste buds but also a wonderful option for those who want to indulge in a gluten-free and vegan-friendly dessert. Enjoy making them this fall!
Step‑by‑Step Instructions for Healthy Pumpkin Truffles
Step 1: Prepare Baking Tray
Begin by lining a baking tray with wax or parchment paper, ensuring it’s secure so your Healthy Pumpkin Truffles won’t stick as they cool. This prep step is essential as it allows for easy removal later on. Set the tray aside while you focus on mixing the filling.
Step 2: Mix Filling
In a medium mixing bowl, combine the pumpkin purée, homemade pumpkin spice, salt, and liquid stevia. Stir these ingredients together until well blended. Gradually add the oat flour, mixing until the dough forms a cohesive, slightly sticky mixture. Once fully combined, you’ll recognize the rich aroma of pumpkin spice filling your kitchen.
Step 3: Shape Truffles
Using your hands, roll the mixture into bite-sized spheres, roughly the size of a golf ball, until you have about 24 Healthy Pumpkin Truffles. If the mixture sticks to your hands, lightly coat them with a little oil to make shaping easier. Set the truffles aside on a separate plate or tray.
Step 4: Melt Chocolate
In a microwave-safe bowl, break the dark chocolate into small pieces and melt it in 30-second intervals in the microwave. Stir between each interval until the chocolate is smooth and fully melted. It should be warm but not bubbling, ready for dipping your truffles into its luscious coating.
Step 5: Coat Truffles
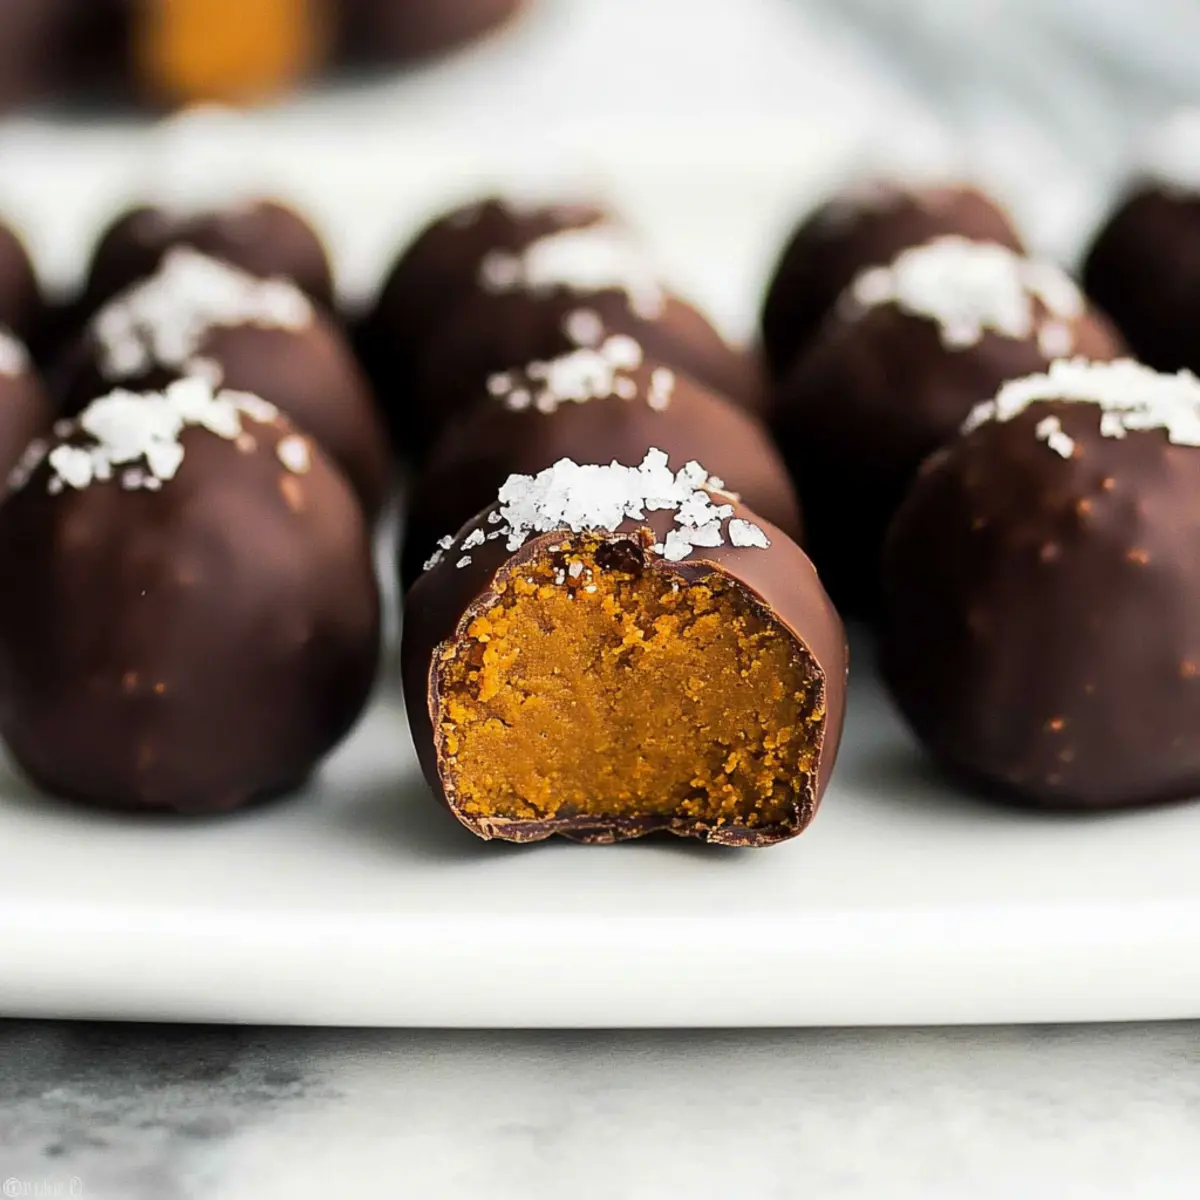
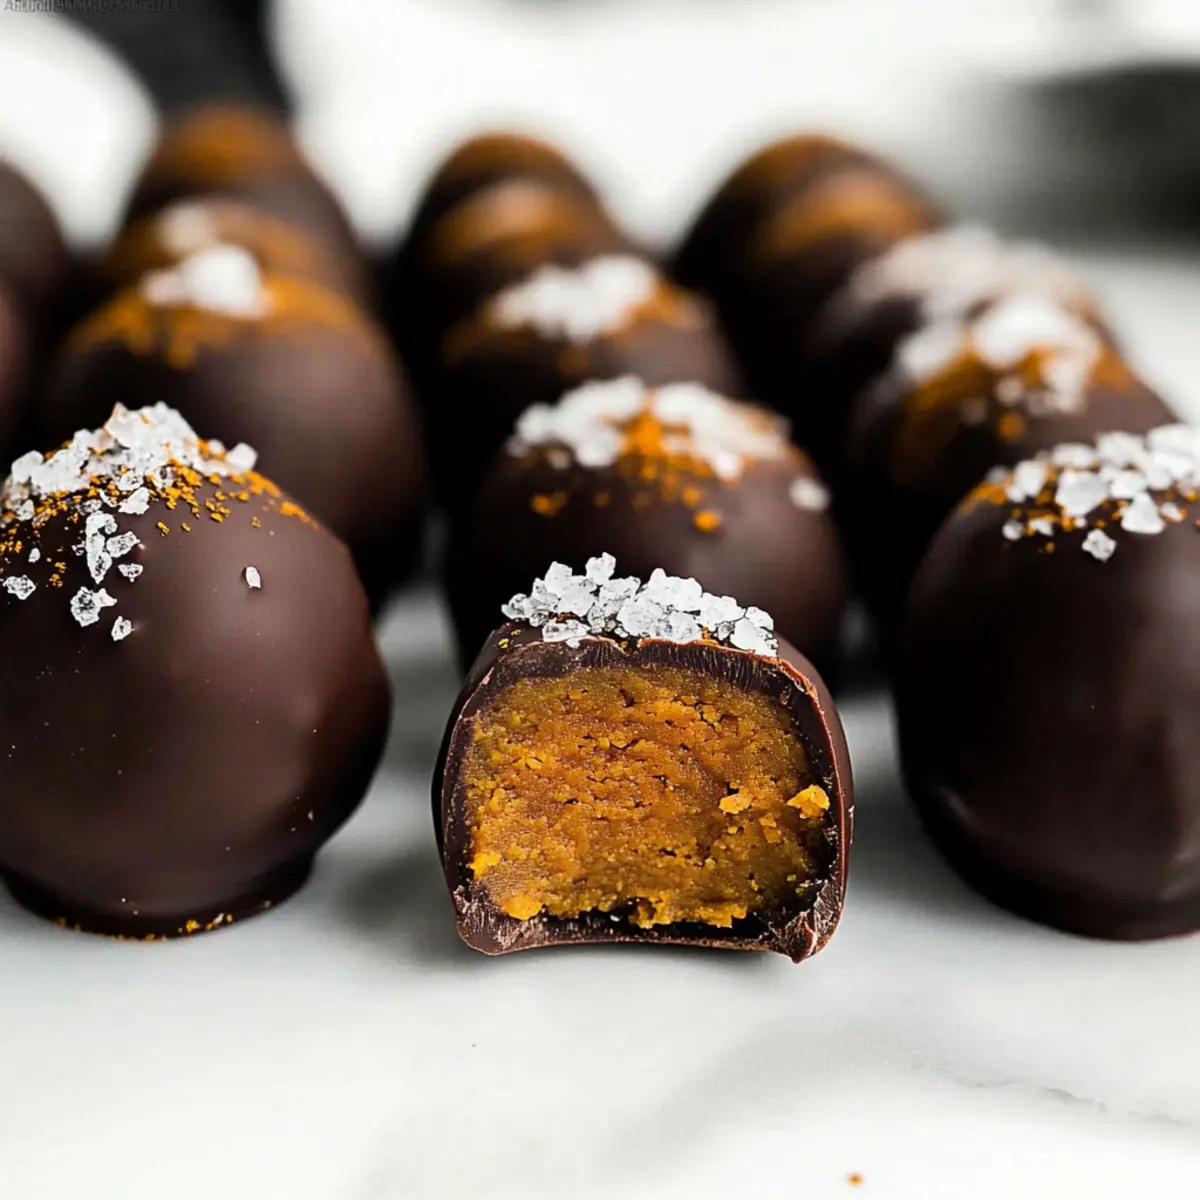
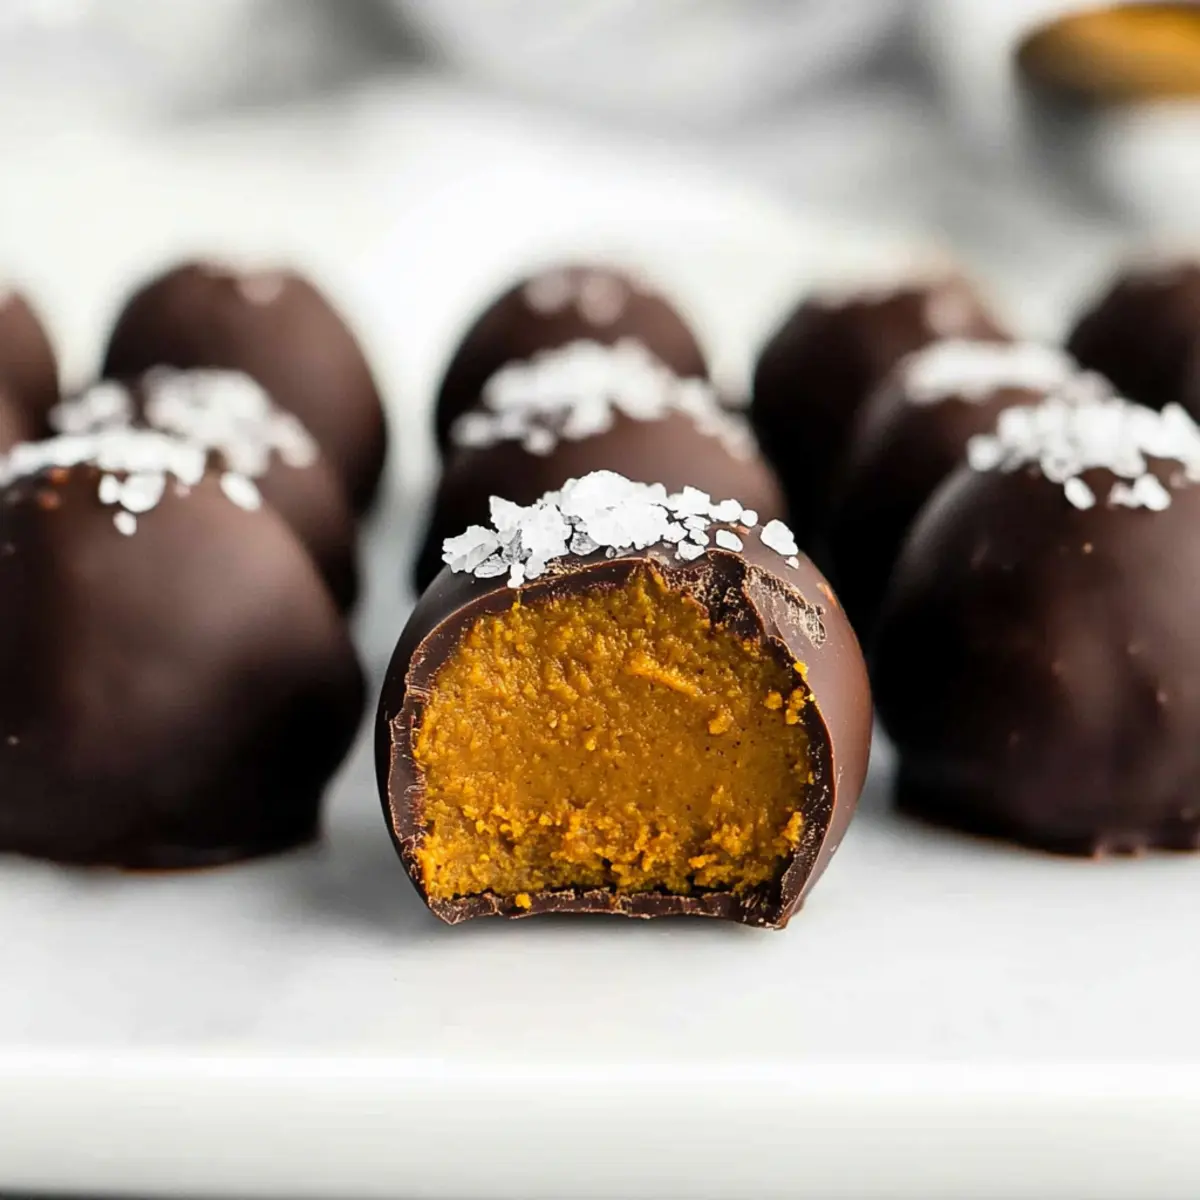
Using a fork, dip each pumpkin sphere into the melted chocolate, ensuring they are fully submerged. Allow the excess chocolate to drip off before placing the truffle back onto your lined baking tray. This creates a beautiful, glossy finish, making your Healthy Pumpkin Truffles look as delicious as they taste.
Step 6: Finish with Sea Salt
Immediately after coating the truffles in chocolate, sprinkle a small pinch of flaky sea salt on top of each one. This step enhances the flavor and adds a delightful contrast to the sweetness of the chocolate. Be sure to do this while the chocolate is still melty for the best adhesion.
Step 7: Chill
Place the tray in the refrigerator for about 15-20 minutes, or pop it in the freezer for 5-10 minutes, allowing the chocolate to harden. Once set, your Healthy Pumpkin Truffles will have a firm shell and be ready to indulge. Enjoy the fruits of your labor as a nutritious yet decadent fall treat!
What to Serve with Healthy Pumpkin Truffles?
As you savor the delightful taste of these truffles, consider pairing them with a few beloved accompaniments to create a well-rounded treat experience.
-
Spiced Chai Tea: The warmth of spiced chai perfectly complements the pumpkin flavors, creating a cozy autumn vibe for your palate.
-
Coconut Whipped Cream: Light and fluffy, this dairy-free topping offers a refreshing contrast to the truffles’ richness, enhancing each bite beautifully.
-
Apple Slices with Almond Butter: Crisp apple slices dipped in creamy almond butter add a sweet crunch that balances the smooth texture of the truffles.
-
Pumpkin Soup: A small serving of creamy pumpkin soup can serve as a delightful starter, harmonizing the seasonal flavors and setting the tone for your fall feast.
-
Dark Chocolate Coffee: A rich, brewed cup of dark chocolate coffee intensifies the dessert experience, merging flavors that everyone will adore during a chilly evening.
-
Caramel Popcorn: This sweet and salty snack offers a fun texture contrast and delightful crunch, making for a playful pairing with the velvety truffles.
These pairing options create a joyful selection that can elevate your dessert experience while celebrating the wonderful flavors of fall!
Make Ahead Options
These Healthy Pumpkin Truffles are a fantastic choice for meal prep, making your baking easier on busy weeknights! You can prepare and shape the truffles up to 24 hours in advance—just ensure to cover them tightly with plastic wrap or store them in an airtight container to keep them fresh. When you’re ready to enjoy, simply melt the dark chocolate, dip the truffles, and finish with flaky sea salt. For longer storage, consider refrigerating the uncoated truffles for up to 3 days, allowing you to dip them in chocolate just before serving to maintain that luscious coating. This way, you can savor gourmet-quality treats in no time!
Healthy Pumpkin Truffles Variations & Substitutions
Feel free to get creative and tailor these delightful truffles to suit your taste buds and dietary preferences!
-
Spice it Up: Swap the pumpkin spice with chai spice for a warm, aromatic twist that adds depth to each bite.
Consider blending in some ground cardamom or a touch of allspice for a unique spin! -
Sweetener Switch: Use maple syrup instead of liquid stevia for added caramel notes and a natural sweetness.
This change will slightly alter the consistency, so keep an eye on the mixture as you combine your ingredients. -
Chocolate Variations: Try using milk chocolate or white chocolate for coating.
Each chocolate type brings its own flavor profile—milk chocolate adds creaminess, while white chocolate introduces a sweeter touch. -
Nutty Flavor: Include finely chopped nuts such as walnuts or pecans in the filling for a delightful crunch.
This adds not only texture but also healthy fats, making your truffles even more satisfying. -
Enhanced Texture: For a chewier texture, consider incorporating toasted coconut flakes into the filling.
Coconut complements the pumpkin flavor beautifully, creating a tropical vibe in a traditional autumn treat. -
Heat it Up: Add a pinch of cayenne pepper or red pepper flakes to the filling for a subtle kick that pairs wonderfully with the sweetness.
This variation brings a warm, surprising twist—perfect for those who like their treats with a little edge. -
Nut-Free Option: Replace oat flour with sunflower seed flour to keep it nut-free while still maintaining a lovely texture.
This allows those with nut allergies to enjoy the same delightful experience without compromise. -
Experiment with Extracts: Substitute vanilla extract for a rich, creamy flavor or add a dash of almond extract for a nutty hint.
Mixing in a little goes a long way in enhancing the overall aroma and taste of your truffles.
Enjoy making these Healthy Pumpkin Truffles your own, and remember, you can always find new inspiration in other recipes like the Spicy Chorizo Pumpkin or the Healthy Chicken Pomodoro for further flavor adventures!
Storage Tips for Healthy Pumpkin Truffles
Fridge: Store your Healthy Pumpkin Truffles in an airtight container in the refrigerator for up to 5 days to maintain their freshness and flavor.
Room Temperature: If you prefer a soft texture, you can leave the truffles covered at room temperature for 1-2 days, though refrigeration is recommended for longer storage.
Freezer: For extended keeping, freeze the truffles in a single layer until solid, then transfer to an airtight container for up to 3 months.
Thawing: To enjoy, simply let the frozen truffles sit at room temperature for about 15-20 minutes or refrigerate overnight for a softer treat.
Expert Tips for Healthy Pumpkin Truffles
Measure Flour Carefully: Accurate flour measurement prevents a crumbly texture; use a kitchen scale for best results.
Keep Chocolate Warm: To ensure a smooth coating, maintain the melted chocolate’s warmth; avoid using chocolate chips as they may not melt smoothly.
Adjust Sweetness: Taste the mixture before rolling into truffles; adjust the liquid stevia based on your personal sweetness preference.
Use Fresh Spices: Homemade pumpkin spice can bring a fresher flavor; consider customizing your own blend for a unique twist.
Oil Your Hands: If the mixture becomes sticky while shaping, lightly oil your hands to make the process easier.
Serve Chilled: These Healthy Pumpkin Truffles taste best after chilling; the flavors develop further, enhancing your indulgent experience.

Healthy Pumpkin Truffles Recipe FAQs
How do I choose the right pumpkin purée?
Absolutely! When making Healthy Pumpkin Truffles, it’s crucial to select regular canned pumpkin purée, as pumpkin pie mix includes added sugars and spices that can alter the flavor of your truffles. Look for a can labeled “100% pure pumpkin” – the color should be a deep orange, indicating ripeness and richness.
How should I store these truffles, and how long do they last?
I recommend placing your Healthy Pumpkin Truffles in an airtight container and storing them in the refrigerator for up to 5 days. They may also be kept at room temperature for 1-2 days, but to preserve their freshness longer, refrigeration is the best option.
Can I freeze Healthy Pumpkin Truffles, and how is it done?
Very! Freezing your truffles is a great idea if you want to enjoy them later. Simply lay them out in a single layer on a baking tray to freeze for about 1-2 hours until solid. Then, pack them into an airtight container or a resealable freezer bag, separating layers with parchment paper to prevent sticking. They can be frozen for up to 3 months. When you’re ready to indulge, just let them thaw at room temperature for 15-20 minutes or overnight in the fridge.
What if my chocolate isn’t melting smoothly?
Oh no! If your melted chocolate isn’t smooth, it could be because you used chocolate chips, which can sometimes be finicky. I suggest using high-quality chocolate bars instead, and remember to melt it in 30-second intervals, stirring between each one. If your chocolate is too thick, you can add a teaspoon of coconut oil to achieve a smoother consistency.
Are these truffles suitable for those with allergies?
Absolutely! These Healthy Pumpkin Truffles are gluten-free and vegan, making them a brilliant choice for many dietary restrictions. However, be mindful of potential allergies to chocolate or any sweeteners you choose to use. Always check the labels on products to ensure they are safe for your specific needs.
Can I customize the flavors in these truffles?
Very! These truffles are quite versatile, so feel free to get creative. You can swap out the homemade pumpkin spice for other flavoring extracts like maple or vanilla. Moreover, if you wish to experiment with different types of chocolate for coating, such as milk or white chocolate, go for it! The more the merrier when it comes to flavor combinations!
Healthy Pumpkin Truffles – Guilt-Free Fall Indulgence
Ingredients
Equipment
Method
- Begin by lining a baking tray with wax or parchment paper.
- In a medium mixing bowl, combine the pumpkin purée, homemade pumpkin spice, salt, and liquid stevia.
- Gradually add the oat flour, mixing until the dough forms a cohesive, slightly sticky mixture.
- Using your hands, roll the mixture into bite-sized spheres, roughly the size of a golf ball.
- In a microwave-safe bowl, break the dark chocolate into small pieces and melt it in 30-second intervals.
- Using a fork, dip each pumpkin sphere into the melted chocolate, ensuring they are fully submerged.
- Immediately after coating, sprinkle a small pinch of flaky sea salt on top of each truffle.
- Place the tray in the refrigerator for about 15-20 minutes to allow the chocolate to harden.
Leave a Reply