
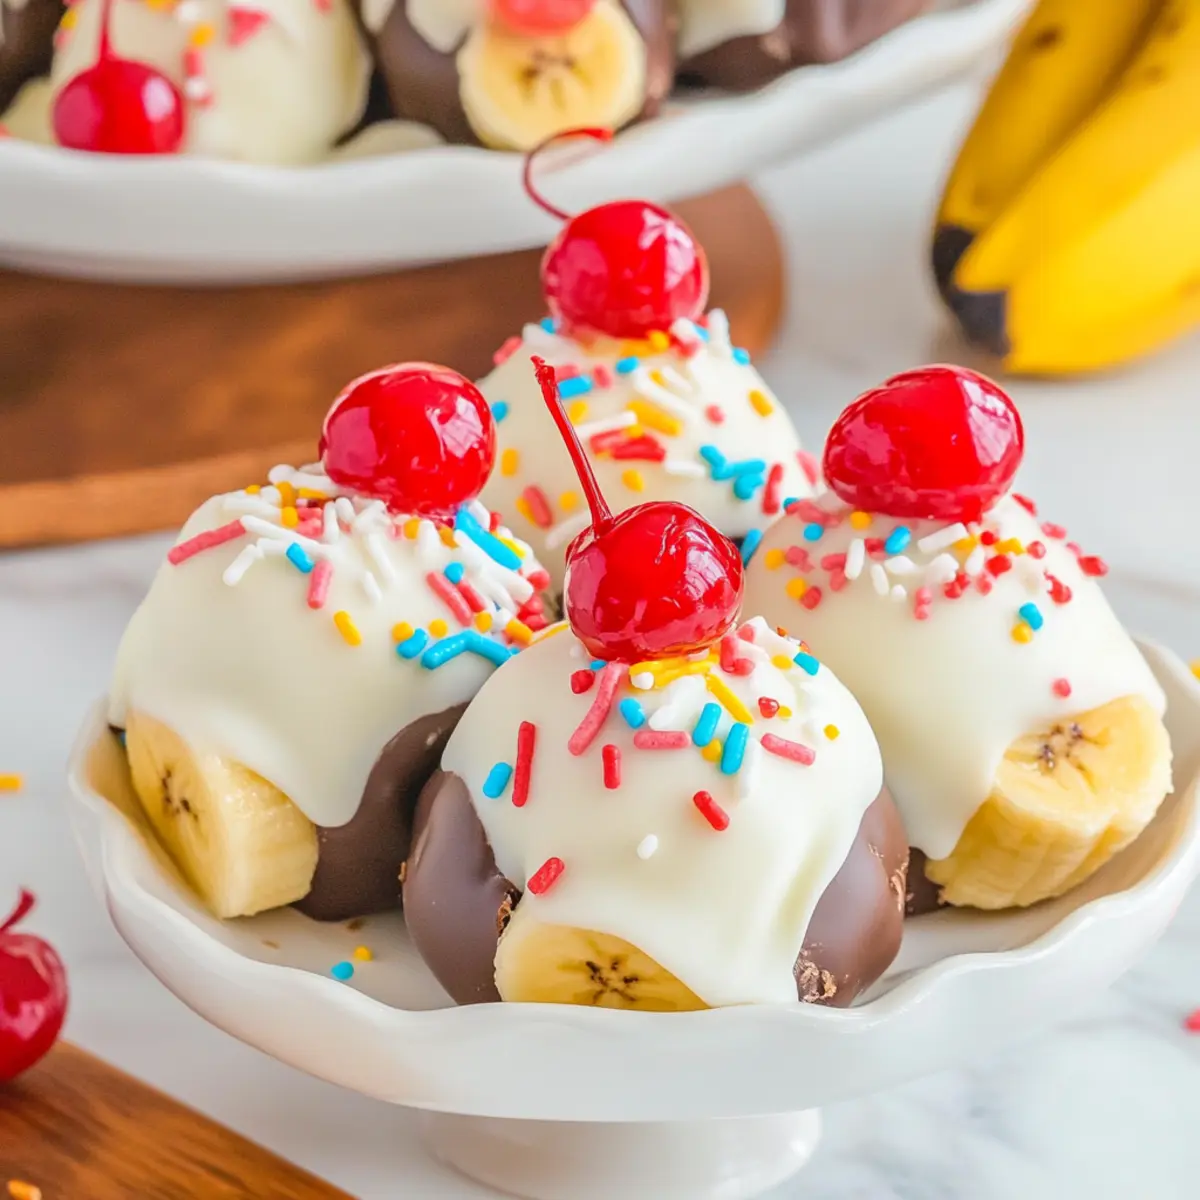
As I rummaged through my pantry one lazy afternoon, I stumbled upon an unexpected treasure—a box of white cake mix that sparked a delicious idea. That’s how the irresistible Banana Split Truffles were born! These delightful no-bake treats transform the joyful essence of a classic banana split into bite-sized bliss. Not only are they quick to prepare with just a handful of ingredients, but they also make for a stunning centerpiece on any dessert table, ensuring smiles all around. With a creamy banana and chocolate flavor wrapped in a velvety coating, you might find them to be the perfect indulgent treat to satisfy your sweet tooth. Ready to impress your friends and family with a fun twist on a nostalgic favorite? Let’s dive into this simple yet satisfying recipe!
Why are Banana Split Truffles a must-try?
Indulgent, No-Bake Treat: These truffles combine convenience with decadence, perfect for those busy days when you crave something sweet without the fuss of baking.
Flavor Explosion: With layers of creamy banana and rich chocolate, they’re like your favorite banana split in a bite-sized form!
Quick to Make: You’ll whip up these delightful bites in just a few minutes, making them an excellent last-minute dessert option for any gathering.
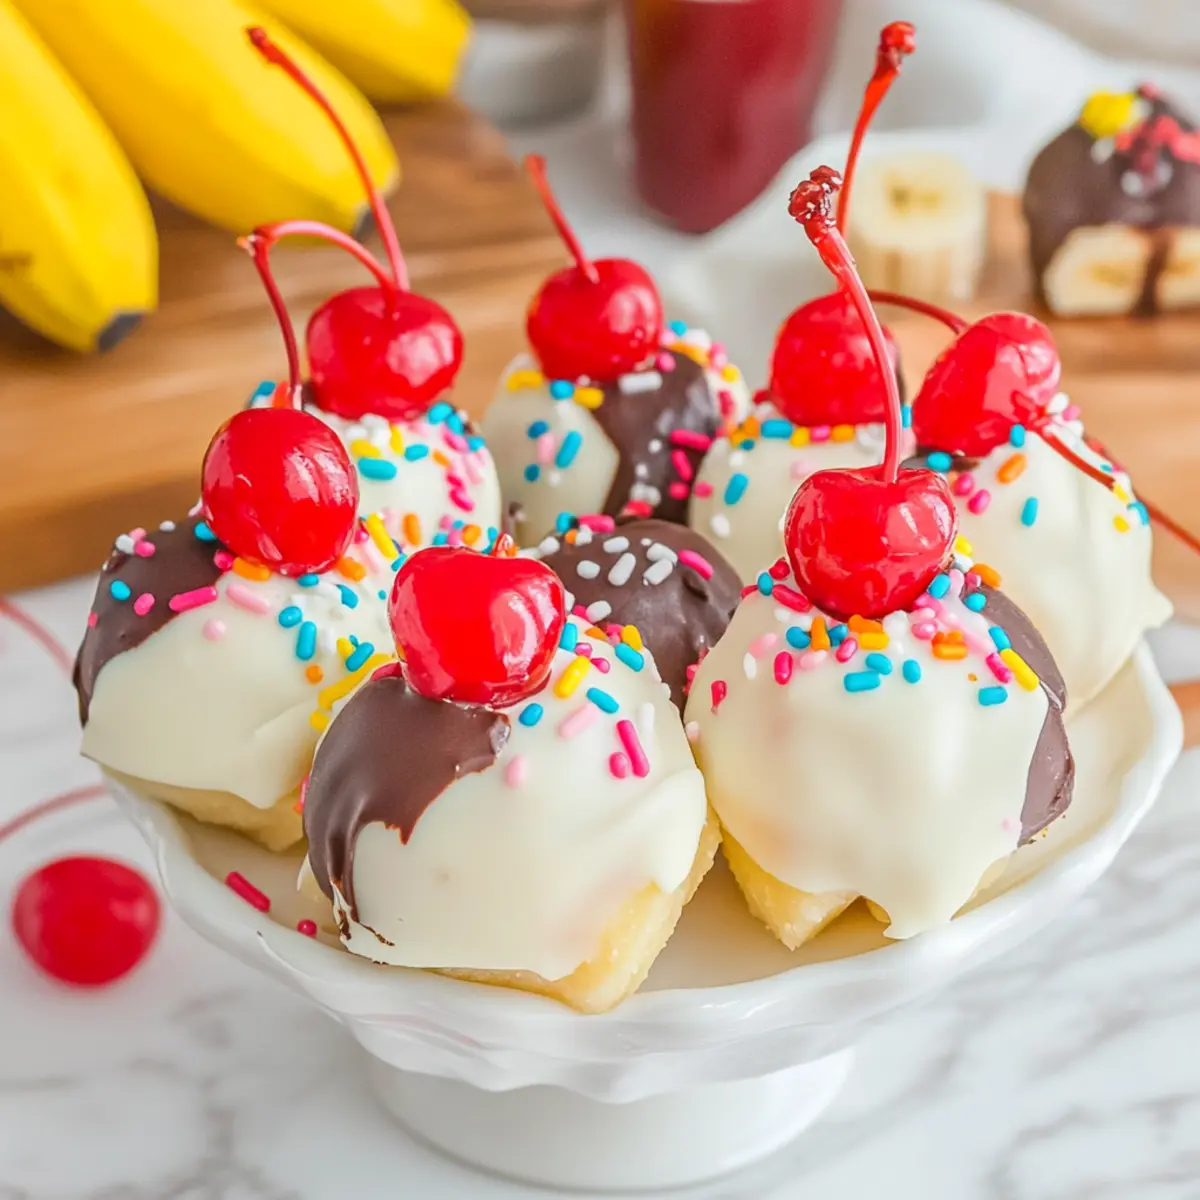
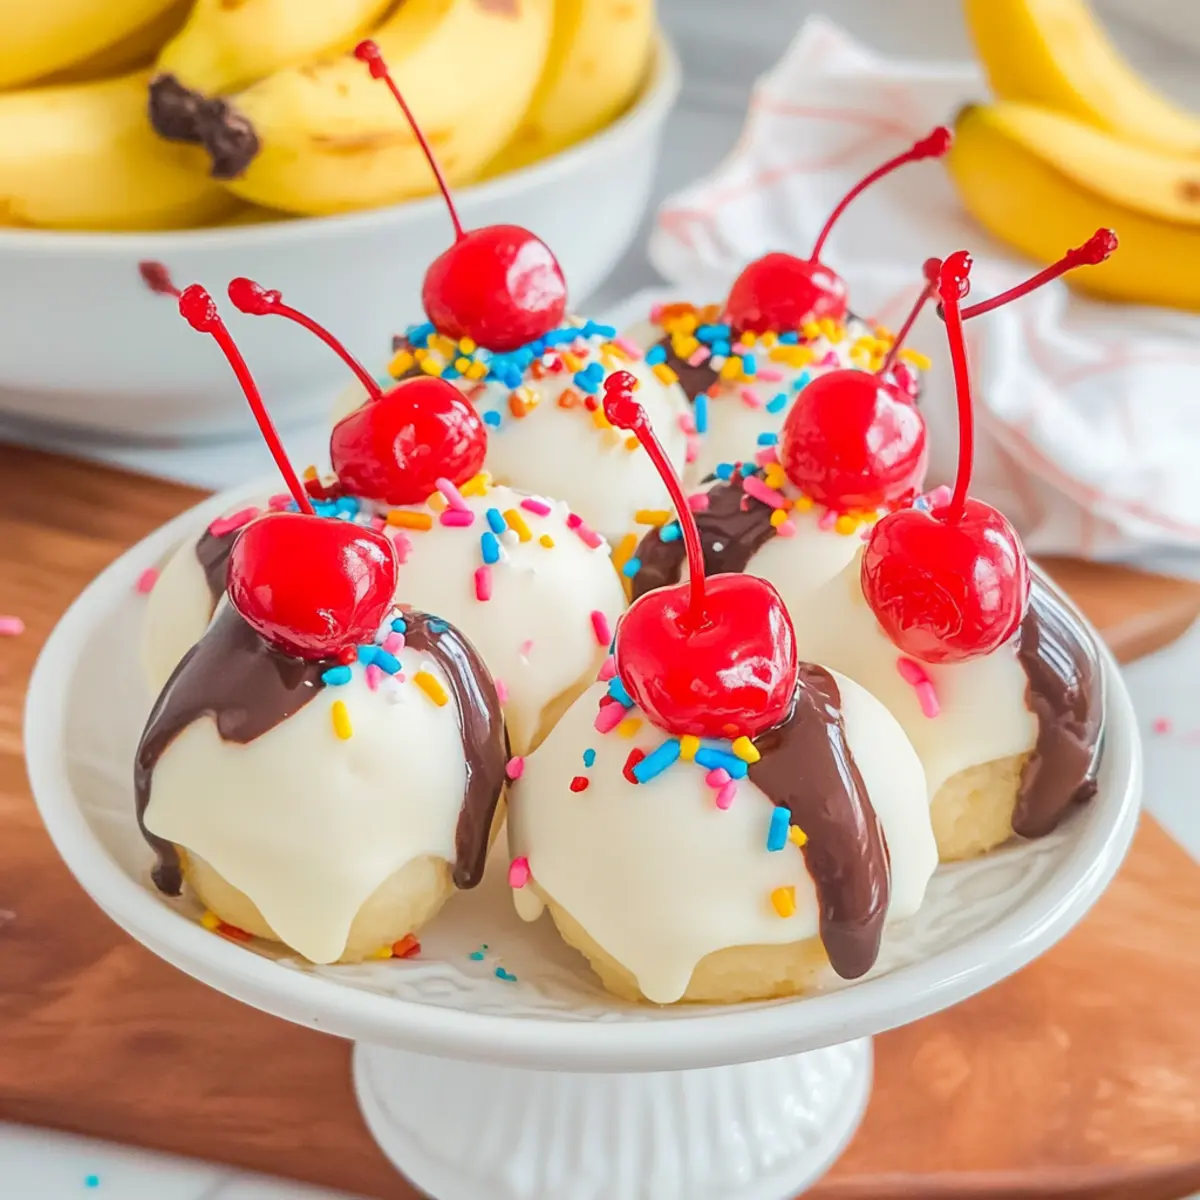
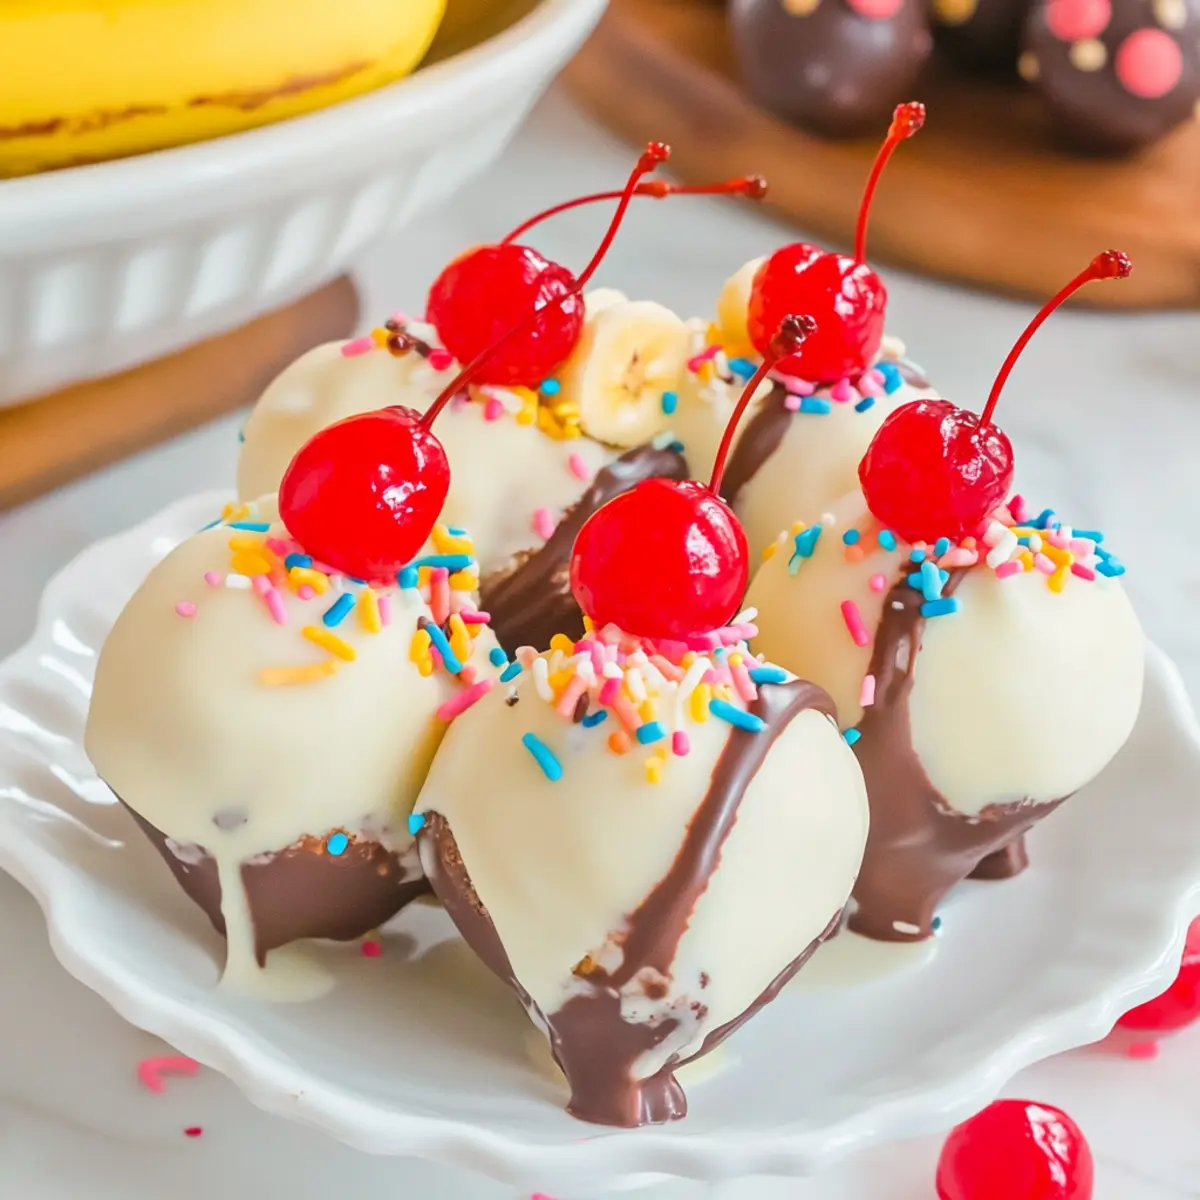
Crowd-Pleaser: Their vibrant colors and fun toppings, like rainbow sprinkles and maraschino cherries, make them instantly appealing to both kids and adults.
Versatile Recipe: Feel free to customize with different nuts or chocolate coatings to match your taste—don’t miss out on trying them with a taste of chocolate melting wafers for an extra treat!
Banana Split Truffles Ingredients
For the Truffle Filling
• White Cake Mix – Provides base structure for truffles; heat treat before using to eliminate any raw taste.
• Cream Cheese – Adds creaminess and richness to the filling; ensure it’s softened for easy mixing.
• Vanilla Extract – Enhances overall flavor; use high-quality vanilla for best taste.
• Crushed Pineapple – Provides fruity sweetness; must be well-drained to prevent a soggy mixture.
• Chopped Walnuts – Adds a crunchy texture; can be substituted with any preferred nut (e.g., pecans).
• Banana – Fresh flavor and moisture; use ripe bananas for optimal sweetness.
For the Coating & Decoration
• White Candy Coating – For coating the truffles; can be swapped with dark or milk chocolate for a different flavor.
• Chocolate Melting Wafers – Used for creating a “chocolate syrup” effect on top of the truffles; ensure they are smooth after melting for an appealing finish.
• Rainbow Sprinkles – For decoration and added fun; optional but recommended for festive appeal.
• Maraschino Cherries – Used as a garnish; can substitute with fresh cherries if preferred.
Step‑by‑Step Instructions for Banana Split Truffles
Step 1: Prepare the Baking Sheet
Start by lining a large baking sheet with parchment paper, ensuring a non-stick surface for the truffles. This will serve as the cooling station where your Banana Split Truffles will rest after being formed and coated. Having everything ready at the outset will make the entire process smoother and more enjoyable.
Step 2: Mix the Base Ingredients
In a mixing bowl, combine the heat-treated white cake mix, softened cream cheese, and vanilla extract. Using a spatula or mixing spoon, blend these ingredients together until you achieve a smooth, dough-like consistency. This is a crucial step for creating the deliciously creamy filling of the Banana Split Truffles, so take your time to ensure everything is evenly incorporated.
Step 3: Fold in the Flavor Boosters
Next, gently fold in the well-drained crushed pineapple, chopped walnuts, and ripe banana slices into the mixture. Stir until the fruits and nuts are evenly distributed throughout the dough, creating that delightful balance of flavors and textures in your truffles. The vibrant colors will start to come through, signaling it’s time to shape the truffles.
Step 4: Shape the Truffles
Using a cookie scoop, scoop out portions of the mixture and roll them into 1 to 1.5-inch balls. Place each ball on the prepared parchment-lined baking sheet, ensuring they are spaced apart for easy handling. The shaping process will be fun, and the aroma of banana and cream cheese will surely entice you as you prepare the truffles for chilling.
Step 5: Chill for Firmness
Refrigerate the formed truffle balls for about 1 hour, allowing them to chill and firm up. This step is essential for achieving the perfect texture when coating your Banana Split Truffles later. As they chill, the flavors will meld together beautifully, enhancing the overall taste of this indulgent treat.
Step 6: Melt the Candy Coating
While the truffles chill, prepare the candy coating by melting the white candy coating in a microwave-safe bowl. Heat it in 30-second increments at 50% power, stirring in between until silky smooth and fully melted. This will create a luscious outer layer for your truffles, so ensure it’s perfectly smooth before proceeding.
Step 7: Coat the Truffles
Once the truffles have chilled and firmed up, dip each one into the melted candy coating. Use a fork to ensure they are fully coated, allowing any excess coating to drip off before returning them to the parchment sheet. The white candy coating will transform your Banana Split Truffles into a gleaming, festive treat that looks as good as it tastes.
Step 8: Set and Cool
Return the coated truffles to the parchment-lined baking sheet and let them cool for about 30 minutes at room temperature. This cooling will help the coating set nicely, giving your Banana Split Truffles a perfect finish. Keep an eye on them as they firm up to ensure they maintain their shape.
Step 9: Add Chocolate Drizzle and Garnish
Melt additional chocolate wafers and use a spoon to drizzle over each of the truffles. Then, place a maraschino cherry on top of each truffle and sprinkle with rainbow sprinkles for a delightful finishing touch. This will elevate your treats, making them even more eye-catching and ensuring your guests will be impressed.
Step 10: Final Chill Before Serving
Chill the finished Banana Split Truffles again for another 30 minutes to let the garnishing set properly. This last chill ensures all the components meld together beautifully and enhances the overall flavor. When ready, remove from the refrigerator, and enjoy the delightful bite-sized bliss you’ve created!
How to Store and Freeze Banana Split Truffles
Fridge: Store your Banana Split Truffles in an airtight container for up to one week. This keeps them fresh and ready to satisfy your sweet cravings.
Freezer: For longer storage, freeze the truffles in a single layer on a baking sheet before transferring them to a freezer-safe bag or container. They can be enjoyed for up to two months!
Reheating: No need to reheat these truffles, as they are best enjoyed chilled or at room temperature. Simply let them sit out for a few minutes before indulging.
Wrapping: If you’re giving them as a gift, wrap each truffle in parchment paper or a small treat bag to keep them cute and fresh!
Make Ahead Options
These Banana Split Truffles are ideal for meal prep enthusiasts looking to save time during busy weeks! You can prepare the truffle filling and shape the truffles up to 24 hours in advance. Just mix the ingredients, shape them into balls, and store them in an airtight container in the refrigerator. To maintain their quality, make sure they are spaced apart to prevent sticking. When you’re ready to enjoy these delightful treats, simply coat them in the melted candy coating and garnish with chocolate drizzle, cherries, and sprinkles before serving. You’ll have a delicious dessert ready with minimal effort, just like magic!
Expert Tips for Banana Split Truffles
• Heat Treating Cake Mix: Always heat treat the white cake mix before using to eliminate any raw taste, ensuring a safe and flavorful truffle base.
• Proper Cooling: If your truffle mixture feels too warm when mixing, pop it in the refrigerator for a few minutes. This will make rolling easier and more effective.
• Quality Ingredients: Use high-quality cream cheese and vanilla extract to enhance the overall flavor profile of your Banana Split Truffles.
• Chill Wisely: Make sure to chill the rolled truffles thoroughly before coating; this helps them maintain shape during the dipping process.
• Custom Toppings: Get creative with garnishes! Use different nuts or sprinkles to personalize your truffles and cater to your guests’ preferences.
Banana Split Truffles Variations & Substitutions
Feel free to get creative with these Banana Split Truffles—your taste buds will thank you for the delicious twists!
-
Chocolate Swirl: Swap white candy coating for dark chocolate to add a rich depth of flavor. The bittersweet chocolate will elevate the dessert, offering a delightful twist on the classic flavor profile.
-
Nut-Free: Omit walnuts altogether or replace them with sunflower seeds if you’re catering to nut allergies, ensuring everyone can enjoy these tasty treats.
-
Vegan-Friendly: Use a dairy-free cream cheese alternative and replace the white cake mix with a plant-based cake mix for an indulgent treat that fits vegan lifestyles.
-
Fruity Variations: Mix in diced strawberries or chopped mango with the banana for a tropical fruity twist. The added burst of fresh fruit flavor will really brighten up the truffles.
-
Spicy Kick: Add a pinch of cayenne or chili powder to the mixture for a bold flavor kick. This unexpected heat will definitely surprise and delight your guests; a firecracker of flavor!
-
Deluxe Chocolate Drizzle: Instead of plain chocolate wafers, opt for flavored melting chocolates like mint or cherry for an extra punch of flavor. It’s a fun way to customize and elevate your truffles!
-
Crunchy Toppings: Consider topping with crushed pistachios or toffee bits for a fun texture contrast. This adds not just a crunch but also extra flavor layers.
And if you’re looking for an even more creative dessert, you might want to check out our Cheese Banana Pudding for a unique twist on beloved flavors. These variations will surely impress your family and friends!
What to Serve with Banana Split Truffles?
A delightful dessert experience awaits as you pair these indulgent morsels with complementary flavors and textures!
-
Vanilla Ice Cream: Creamy and smooth, a scoop enhances the tropical flavors of the truffles, creating a dessert harmony that feels like a mini banana split.
-
Chocolate Dipped Strawberries: These elegant bites add a refreshing burst of sweetness and a touch of tartness, perfectly balancing the richness of the truffles.
-
Whipped Cream: Light and airy, a dollop of freshly whipped cream on the side offers a luscious contrast to the dense chocolate coating of the truffles.
-
Fresh Fruit Salad: A vibrant mix of berries, melons, and citrus provides a fresh, juicy contrast, adding brightness to the sweet richness of the truffles.
-
Caramel Sauce: Drizzling rich caramel over the Banana Split Truffles amplifies their indulgent nature, making each bite even more decadent and enjoyable.
-
Coffee or Espresso: The robust flavors of coffee or a rich espresso provide a lovely warmth against the sweetness, enhancing the truffle experience for adults.
-
Chocolate Milkshake: An indulgent pairing, a creamy chocolate milkshake brings a nostalgic twist, resembling the classic combination of chocolate and banana.
-
Nutty Biscotti: The crunchy texture of biscotti adds a satisfying crunch alongside the truffles, making for a deliciously paired dessert platter.
Banana Split Truffles Recipe FAQs
How do I choose ripe bananas for this recipe?
Absolutely! For your Banana Split Truffles, select bananas that are slightly speckled with brown spots, as they indicate ripeness and sweetness. Overripe bananas with dark spots are perfect—this level of ripeness will impart a delightful flavor to your truffles!
What’s the best way to store Banana Split Truffles?
Very! Store your Banana Split Truffles in an airtight container in the refrigerator for up to one week. Just make sure they’re properly sealed so they stay fresh and maintain their delicious flavor. If you find yourself with leftovers, they won’t last long—I promise!
Can I freeze Banana Split Truffles, and how?
You can! To freeze your truffles, start by placing them in a single layer on a baking sheet lined with parchment paper. Freeze them for about 1-2 hours until they’re solid, then transfer them to a freezer-safe bag or container. They can stay there for up to two months. When you’re ready to enjoy, just let them thaw in the fridge for a few hours.
What should I do if my truffle mixture is too sticky?
No worries! If your Banana Split Truffle mixture is too sticky to roll, simply refrigerate it for 10 to 15 minutes. This will firm it up, making it easier to scoop and roll into those adorable bite-sized balls. It’s a simple fix to get you back on track!
Are these truffles safe for kids and those with nut allergies?
Absolutely! If you’re concerned about nuts, you can substitute the walnuts with sunflower seeds or completely skip them. Always ensure you use nut-free ingredients for the coating as well. These truffles are fun and safe for the family to enjoy together!
Decadent Banana Split Truffles for a No-Bake Bliss
Ingredients
Equipment
Method
- Line a large baking sheet with parchment paper.
- Mix together the heat-treated white cake mix, softened cream cheese, and vanilla extract until smooth.
- Fold in well-drained crushed pineapple, chopped walnuts, and ripe banana slices.
- Scoop portions of the mixture and roll into 1 to 1.5-inch balls, placing them on the prepared baking sheet.
- Refrigerate the truffle balls for about 1 hour to firm.
- Melt the white candy coating in a microwave-safe bowl until smooth.
- Dip each truffle into the melted candy coating and return them to the baking sheet.
- Let them cool for about 30 minutes at room temperature.
- Drizzle melted chocolate wafers over the truffles, garnish with a maraschino cherry, and sprinkle with rainbow sprinkles.
- Chill again for 30 minutes before serving.
Leave a Reply