
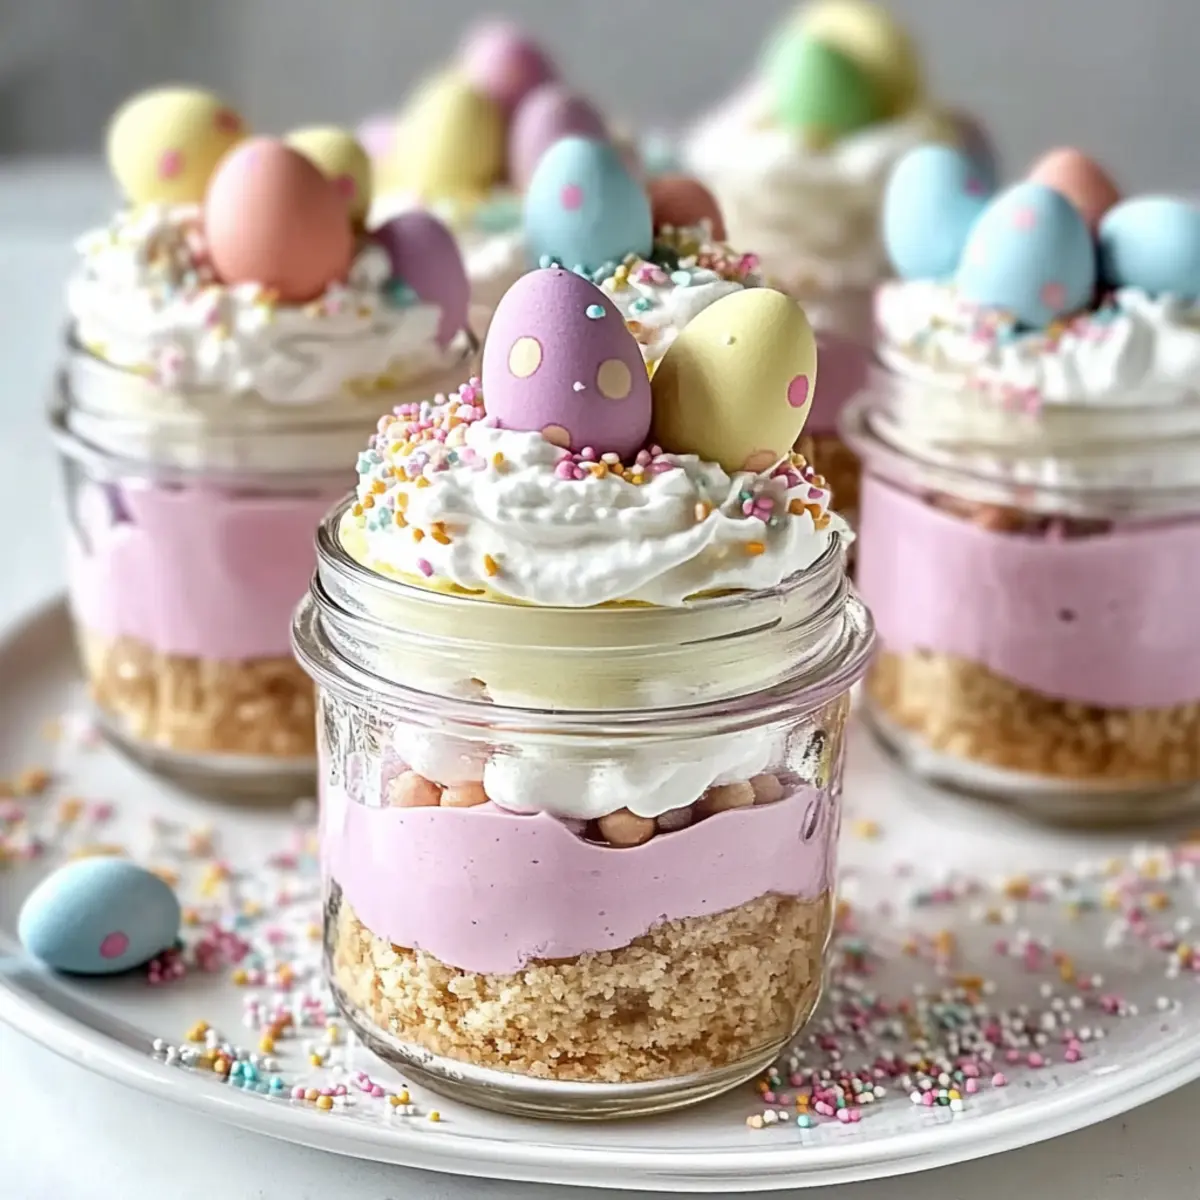
As I stood with my family under the blooming cherry blossoms, the anticipation of Easter hung in the air. It reminded me of joyful gatherings filled with laughter—and, of course, delicious food! That’s when the idea for these delightful Easter Egg Cheesecake Jars popped into my mind. This no-bake treat dazzles with layers of creamy pastel cheesecake, a buttery graham cracker crust, and festive candy eggs that make it not just a dessert but a centerpiece for spring celebrations. These jars are exceptionally easy to whip up, making them a fantastic choice for anyone looking to impress without the fuss, and they’re endlessly customizable, allowing you to match them to your choice of colors and flavors. Whether for brunch with friends or a fun family gathering, how can you resist such a cheerful spring delight in a jar?
Why Are These Cheesecake Jars So Irresistible?
Festive and Fun: These Easter Egg Cheesecake Jars bring a cheerful color splash to your table, making them perfect for spring celebrations.
No-Bake Ease: Forget complicated baking! This recipe requires minimal time and effort, letting you focus on enjoying the festivities.
Customizable Creativity: Personalize each jar with your favorite colors and flavors—try chocolate cookie bases or vibrant fruit purees for a unique twist.
Delightful Presentation: Beautifully layered cheesecakes in jars look impressive and will capture everyone’s attention; they’re a guaranteed showstopper at any gathering.
Kid-Friendly: This dessert is perfect for kids and adults alike, making it a charming addition to any Easter brunch or family picnic.
With so many delightful variations, you’ll find this recipe to be as versatile as your creativity—check out ideas like Cheesecake Stuffed Strawberries for more festive inspiration!
Easter Egg Cheesecake Jars Ingredients
• Here’s what you need to create these delightful Easter Egg Cheesecake Jars!
For the Crust
- Graham Cracker Crumbs – The perfect base structure; alternative: crushed Oreos for a chocolatey twist.
- Granulated Sugar – Adds just the right amount of sweetness to the crust; no substitutions suggested.
- Unsalted Butter – Binds everything together; substitute with margarine if needed.
For the Cheesecake Filling
- Cream Cheese – Essential for that rich, creamy texture; ensure it’s at room temperature for easy mixing.
- Powdered Sugar – Sweetens the cheesecake to perfection; no substitutions suggested.
- Vanilla Extract – Introduces a lovely flavor; using pure vanilla will enhance the taste.
- Heavy Cream – Incorporates that light, fluffy texture; be sure to whip it to stiff peaks.
- Pink Gel Food Coloring (optional) – Adds a fun pastel hue; alternatively, use freeze-dried strawberry powder for a natural color.
For the Toppings
- Whipped Cream – Provides a creamy layer and a base for additional decorations; consider using stabilized whipped cream for longevity.
- Pastel Candy Eggs – A charming decorative element that fits perfectly with the Easter theme; any small candy can be a substitute.
- Rainbow or Pastel Sprinkles – A festive final touch; no substitutions suggested.
Now that you have everything ready, the only thing left is to dive into the fun of assembling these colorful Easter Egg Cheesecake Jars!
Step‑by‑Step Instructions for Easter Egg Cheesecake Jars
Step 1: Prepare the Crust
In a mixing bowl, combine graham cracker crumbs with granulated sugar and melted unsalted butter, stirring until the mixture resembles damp sand. Firmly press this crumb mixture into the bottom of your jars to form a sturdy crust, ensuring an even layer. Once completed, set the jars aside as you move on to the cheesecake filling.
Step 2: Mix the Cheesecake Filling
In a large mixing bowl, beat softened cream cheese with an electric mixer until it’s completely smooth and creamy. Gradually add in powdered sugar and vanilla extract, continuing to blend until light and airy. This fluffy mixture will serve as the delicious base for your Easter Egg Cheesecake Jars, creating that rich taste everyone loves.
Step 3: Whip the Heavy Cream
In a separate clean bowl, whip heavy cream until stiff peaks form, which typically takes about 3-5 minutes with an electric mixer on high speed. Once whipped, gently fold half of this whipped cream into the cream cheese mixture until fully incorporated. Then, add the remaining whipped cream, folding until no streaks remain, creating a beautifully light cheesecake filling.
Step 4: Divide and Color the Mixture
Carefully divide the cheesecake mixture into two bowls. In one bowl, add a few drops of pink gel food coloring or sprinkle in freeze-dried strawberry powder, stirring gently to achieve a uniform pastel hue. This will provide a lovely contrast in your Easter Egg Cheesecake Jars, enhancing their festive appearance.
Step 5: Layer the Cheesecake
Starting with the pink cheesecake filling, layer it into your prepared jars, smoothing it evenly with a spatula. Follow this with a layer of the plain white cheesecake filling, ensuring each layer is distinct and appealing. For a more polished look, use a piping bag to add the filling, providing a clean and professional finish to your festive dessert.
Step 6: Add the Toppings
Before serving, delicately top each jar with a swirl of whipped cream, creating a fluffy, inviting finish. Sprinkle pastel candy eggs and a handful of colorful sprinkles on top for an eye-catching decoration. This step enhances both the visual appeal and the delightful taste of the Easter Egg Cheesecake Jars.
Step 7: Chill and Set
Once assembled, place your jars in the refrigerator and chill for at least 2 hours to allow the layers to set properly. This chilling period ensures that your cheesecake jars hold their shape when served, allowing you to enjoy perfect layers with every spoonful of this delightful no-bake treat.
What to Serve with Easter Egg Cheesecake Jars
Enhance your Easter celebrations with delightful sides and beverages that complement these charming no-bake treats.
- Fresh Berries: Juicy strawberries, blueberries, or raspberries add a burst of freshness and a lovely tart contrast to the sweet cheesecake.
- Carrot Cake Slices: The warm spices and moist texture of carrot cake beautifully harmonize with the creamy layers of cheesecake, making for a delightful pairing.
- Light Salad: A crisp, refreshing spring salad with mixed greens, citrus segments, and a light vinaigrette balances the richness of the jars.
- Herbal Iced Tea: Refreshing herbal iced tea offers a fragrant counterpoint; consider flavors like mint or chamomile for a soothing touch.
- Chocolate Fondue: Indulge in a fun chocolate fondue station where guests can dip fruits and marshmallows, adding an interactive element to your gathering.
- Mini Quiches: These savory bites provide a lovely contrast to the sweet jars; choose flavors like spinach and feta or classic ham and cheese for variety.
- Pineapple Sorbet: A light and fruity sorbet cleanses the palate, making it a refreshing end note after each sweet spoonful.
With these accompaniments, your Easter gathering will be both festive and memorable!
How to Store and Freeze Easter Egg Cheesecake Jars
Fridge: Keep your Easter Egg Cheesecake Jars in the refrigerator for up to 3 days. Ensure they’re covered with plastic wrap or stored in an airtight container to maintain freshness.
Freezer: For longer storage, you can freeze these jars for up to 2 months. Before freezing, omit the whipped cream and toppings. Thaw in the fridge overnight before serving and add toppings fresh.
Preparation Ahead: You can make these jars a day in advance! Just prepare everything up to the chilling stage, and add decorations right before serving to keep them looking their best.
Reheating: There’s no need to reheat these no-bake desserts, as they are best enjoyed cold directly from the fridge!
Expert Tips for Easter Egg Cheesecake Jars
-
Chill Time Matters: Allow the jars to chill for a minimum of 2 hours; this ensures the layers set neatly and hold their shape when served.
-
Texture is Key: Make sure the cream cheese is at room temperature for easy blending, leading to a smooth and airy cheesecake filling.
-
Whipping Cream Wisely: Whip the heavy cream to stiff peaks; this will give your cheesecake a light and fluffy texture that makes each bite delightful.
-
Layer Like a Pro: Use a piping bag for layering the cheesecakes in jars; it creates a cleaner presentation that will impress your guests.
-
Decorate Delightfully: Add a drop of lemon zest to the white layer for a burst of flavor; it complements the sweetness of the Easter Egg Cheesecake Jars beautifully.
Make Ahead Options
These Easter Egg Cheesecake Jars are perfect for meal prep, allowing you to enjoy delightful homemade treats with ease! You can prepare the cheesecake filling and crust up to 24 hours in advance; simply refrigerate them in separate containers to maintain their freshness and prevent any sogginess. The assembled jars should be chilled without toppings, ensuring the layers set beautifully. When you’re ready to serve, just add the whipped cream, pastel candy eggs, and sprinkles just before enjoying. This way, you’ll have a stunning dessert ready for your gathering, saving you time and keeping the flavors just as vibrant and delicious!
Easter Egg Cheesecake Jars Customization
Let your creativity shine by personalizing these delightful jars to fit your taste and festive theme!
-
Gluten-Free: Swap graham cracker crumbs for gluten-free cookie crumbs to accommodate dietary needs while keeping the same delicious texture.
-
Chocolate Lovers: Replace the crust with crushed Oreo cookies for a rich and indulgent twist that adds a touch of decadence.
-
Fruit Flavor: Incorporate raspberry or blueberry purees into the cheesecake mixture for a burst of fruity flavor that complements the creamy base.
-
Colorful Layers: Use a variety of food colorings to create even more vibrant layers—experiment with purple, blue, or green for a rainbow effect!
-
Nutty Delight: Blend in crushed nuts, like almonds or pecans, into the crust for a crunchy texture that enhances each bite—perfect for those who enjoy a nutty crunch.
-
Savory Touch: Consider adding a pinch of cinnamon or nutmeg to the cheesecake filling for a warm spice twist that beautifully contrasts the sweet elements.
-
Tropical Vibes: Introduce coconut milk into your filling for a subtle tropical flavor that transports you to a warm getaway, perfectly paired with pastel décor.
-
Mini Cheesecakes: Scale down the jars into mini portions for bite-sized treats that are great for kids or as party favors.
These scrumptious variations ensure that your Easter Egg Cheesecake Jars are as unique as your gathering. Don’t hesitate to explore more fun recipes like Cookie Butter Cheesecake or Crisp Mini Cheesecakes to keep the celebrations going!
Easter Egg Cheesecake Jars Recipe FAQs
How do I choose ripe ingredients for my cheesecake jars?
Absolutely! For the best flavor, ensure your cream cheese is softened to room temperature. When using fresh fruit for additional flavor or decoration, like strawberries or other garnishes, select vibrant, firm fruit without dark spots or blemishes.
How should I store my Easter Egg Cheesecake Jars?
To keep your jars fresh, store them in the refrigerator covered with plastic wrap or in an airtight container. They will stay delicious for up to 3 days. Make sure to add toppings just before serving to maintain their appealing look!
Can I freeze these cheesecake jars?
Very! You can freeze the Easter Egg Cheesecake Jars without the toppings for up to 2 months. First, prepare everything as instructed, then omit the whipped cream and decorative elements. To thaw, place them in the refrigerator overnight before serving. Add fresh toppings to delight everyone!
What should I do if my cheesecake filling is too runny?
If your cheesecake filling seems runny, it may be due to insufficient whipping of the heavy cream or under-mixing the cream cheese. Ensure your cream is whipped to stiff peaks and blend the cream cheese mixture until it’s light and airy. If necessary, refrigerate it briefly to help it firm up more.
Are these jars safe for kids and those with allergies?
Absolutely! The Easter Egg Cheesecake Jars are kid-friendly, and you can customize them to avoid common allergens. Substitute with dairy-free cream cheese and whipped toppings if needed. Always stay mindful of the specific allergies present in your gathering—adjust the ingredients accordingly for a safe and enjoyable treat!
Delightful Easter Egg Cheesecake Jars for Sweet Spring Celebrations
Ingredients
Equipment
Method
- In a mixing bowl, combine graham cracker crumbs with granulated sugar and melted unsalted butter, stirring until the mixture resembles damp sand. Firmly press this crumb mixture into the bottom of your jars to form a sturdy crust, ensuring an even layer. Once completed, set the jars aside.
- In a large mixing bowl, beat softened cream cheese with an electric mixer until smooth and creamy. Gradually add in powdered sugar and vanilla extract, continuing to blend until light and airy.
- In a separate clean bowl, whip heavy cream until stiff peaks form, which typically takes about 3-5 minutes. Gently fold half of this whipped cream into the cream cheese mixture until fully incorporated. Then, add the remaining whipped cream.
- Carefully divide the cheesecake mixture into two bowls. In one bowl, add pink gel food coloring or freeze-dried strawberry powder and stir gently.
- Layer the pink cheesecake filling into your prepared jars, followed by a layer of the plain white cheesecake filling.
- Delicately top each jar with whipped cream, then sprinkle pastel candy eggs and colorful sprinkles on top.
- Place your jars in the refrigerator and chill for at least 2 hours to allow the layers to set properly.
Leave a Reply