
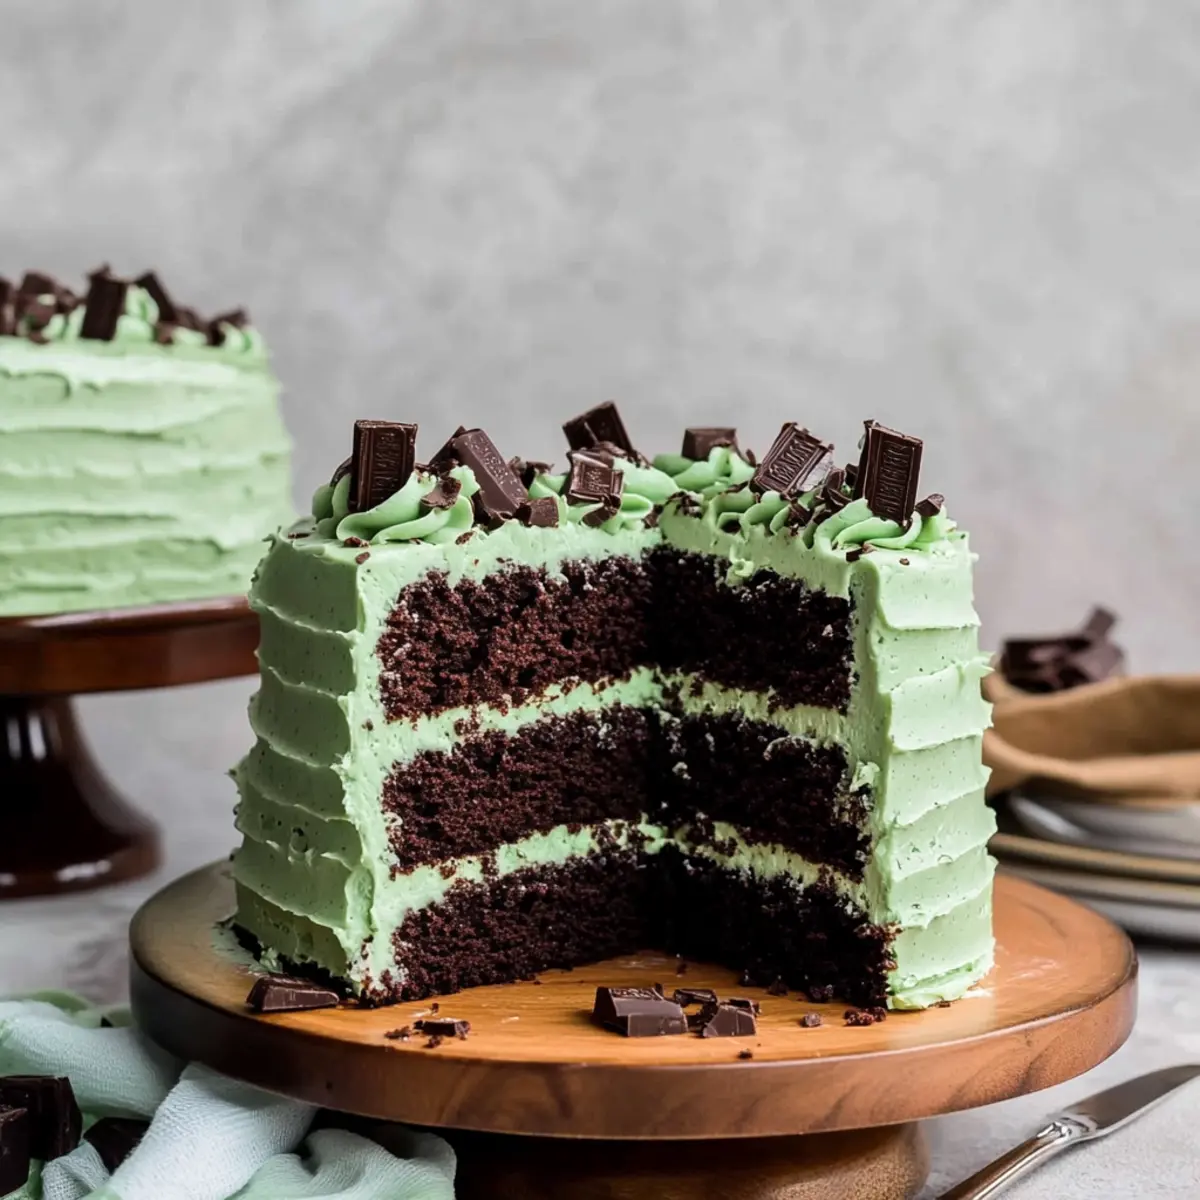
There’s something magical about the combination of chocolate and mint that catapults you back to your childhood, evoking memories of colorful ice cream cones and giggly birthday parties. Our Andes Chocolate Mint Cake captures that nostalgia perfectly in a stunning, three-layer treat! With its moist chocolate cake, sumptuous mint frosting, and delightful chunks of Andes mints, this recipe is not just a feast for the eyes but also a crowd-pleaser for any celebration. One of the best perks? It’s surprisingly simple to make, allowing you to impress your friends and family without stress. Plus, it’s versatile enough to adapt—think cupcakes or a lovely sheet cake variation! Curious about how to make this spectacular dessert? Let’s dive into the details!

Why is Andes Chocolate Mint Cake a must-try?
Nostalgic Flavors: This cake brings back childhood memories of mint chocolate chip ice cream and festive celebrations.
Impressive Layers: The three soft, moist layers are not only beautiful but also provide a melt-in-your-mouth experience.
Easy to Make: You don’t need to be a master baker; the steps are simple and manageable!
Versatile Options: Transform this delightful recipe into cupcakes or a sheet cake to suit any occasion or family preference.
Party Crowd-Pleaser: With the charm of Andes mints, this cake is guaranteed to impress your guests and leave them coming back for more!
Customizable: The frosting can easily be swapped for cream cheese for a different flavor twist, making it unique every time.
Andes Chocolate Mint Cake Ingredients
This delightful Andes Chocolate Mint Cake is all about indulgence and flavor!
For the Cake
- All-purpose flour – Provides structure and body; be sure to spoon and level to avoid compacting.
- Dutch process cocoa powder – Adds a deep chocolate flavor; for best results, avoid substitutions.
- White granulated sugar – Sweetens the cake and helps retain moisture; it’s essential for that perfect texture.
- Baking powder & Baking soda – Both work as leavening agents; ensure freshness for the best rise.
- Salt – Enhances flavor balance; never skip this ingredient in baked goods!
- Canola or vegetable oil – Adds moisture to the cake; keep it at room temperature before use.
- Pure vanilla extract – Infuses flavor depth; be sure to use pure, not imitation.
- Large eggs – Provide structure and moisture; room temperature eggs mix better into the batter.
- Buttermilk – Contributes to cake tenderness; if unavailable, milk can be a substitute.
- Hot water – Blooms the cocoa for an even richer flavor; don’t skip this step for the ultimate chocolate experience.
For the Frosting
- Unsalted butter – Ensures a creamy texture for the frosting; slightly cold is best for mixing.
- Powdered sugar – Creates a sweet, fluffy frosting; always sift before adding to avoid lumps.
- Peppermint extract – Key for achieving that signature minty flavor; it makes the cake truly special.
- Heavy cream – Adds lightness to the frosting; use fresh for the best results.
- Semisweet chocolate bar (chopped) – Infuses chocolatey texture and flavor into the frosting; high-quality chocolate is recommended.
For Decoration
- Andes mints – The star component for filling and decoration; can substitute with Thin Mint cookies if desired.
- Food dye (blue, green, brown) – Helps achieve that perfect mint green color; gel food coloring is ideal for vibrancy.
Now, gather your ingredients and prepare to create a luscious Andes Chocolate Mint Cake that’s sure to be the centerpiece of your next celebration!
Step‑by‑Step Instructions for Andes Chocolate Mint Cake
Step 1: Preheat Oven
Begin by preheating your oven to 350°F (175°C). Grease three 8-inch round cake pans with non-stick cooking spray, then line the bottoms with parchment paper. This step ensures that your Andes Chocolate Mint Cake will come out easily after baking—no sticky situations here!
Step 2: Mix Dry Ingredients
In a large mixing bowl, sift together 2 cups of all-purpose flour, ¾ cup of Dutch process cocoa powder, 2 cups of granulated sugar, 1 ½ teaspoons of baking powder, 1 ½ teaspoons of baking soda, and 1 teaspoon of salt. Mixing these ingredients will develop the cake’s structure and rich chocolate flavor. Set this bowl aside for now.
Step 3: Prepare Wet Ingredients
In another bowl, whisk together 1 cup of canola oil, 4 large eggs (at room temperature), 1 cup of buttermilk, and 2 teaspoons of pure vanilla extract until well combined. Gradually stir in 1 cup of hot water to help bloom the cocoa. This mixture brings moisture and flavor, ensuring your Andes Chocolate Mint Cake is irresistibly tender.
Step 4: Combine Mixtures
Slowly pour the wet ingredients into the bowl with the dry ingredients. Gently mix with a rubber spatula until just combined, taking care not to overmix. This step is crucial for a light and airy cake. You’ll know it’s ready when no floury streaks remain and the batter is smooth and glossy.
Step 5: Bake
Divide the batter evenly among the three prepared pans. Place them in the preheated oven and bake for 24–27 minutes. You can check for doneness by inserting a toothpick into the center of the cakes; it should come out clean. Once baked, allow them to cool in the pans for about 10 minutes before transferring the cakes to a wire rack to cool completely.
Step 6: Make Frosting
While the cakes cool, prepare the frosting. In a mixing bowl, beat 1 cup of cold unsalted butter until creamy. Gradually add in 4 cups of sifted powdered sugar, mixing until combined. Stir in 1 teaspoon of peppermint extract, a pinch of salt, and 2–4 tablespoons of heavy cream until the frosting is light and fluffy. Fold in 4 ounces of chopped semisweet chocolate for that rich, chocolatey kick.
Step 7: Assemble Layers
Once the cakes are completely cool, it’s time to assemble your Andes Chocolate Mint Cake. Place one layer on a serving plate and pipe a layer of frosting on top, then sprinkle with chopped Andes mints. Repeat this process with the second layer before adding the final cake layer, which you will then frost completely.
Step 8: Final Touches
To enhance the presentation, frost the entire cake smoothly and create swirls or decorative patterns on top. Finish by topping with extra Andes mints for that delightful pop of color and minty goodness. Your stunning Andes Chocolate Mint Cake is now ready to be sliced and shared!

Expert Tips for Andes Chocolate Mint Cake
-
Measure Accurately: Use a spoon to scoop flour and level with a knife. This prevents packing, ensuring a light and fluffy cake.
-
Room Temperature Ingredients: Allow eggs and buttermilk to reach room temperature for better emulsification, giving your Andes Chocolate Mint Cake a moist texture.
-
Check Freshness: Make sure your baking powder and baking soda are fresh; expired leavening agents can cause your cake to not rise properly.
-
Cooling Time Matters: Cool cakes completely before frosting to prevent melting and sliding, resulting in a beautifully layered effect.
-
Avoid Overmixing: Gently combine wet and dry ingredients; overmixing can lead to a dense cake. Perfect texture comes from careful mixing!
-
Customize Your Frosting: Feel free to swap in cream cheese frosting for a tangy twist or try different mint chocolates for varied flavor.
Storage Tips for Andes Chocolate Mint Cake
Fridge: Store the cake in an airtight container or cover it tightly with plastic wrap to keep it fresh for up to 5 days.
Freezer: Wrap individual slices tightly in plastic wrap, then place them in a freezer-safe container. They can be frozen for up to 30 days.
Thawing: To enjoy your frozen Andes Chocolate Mint Cake, simply transfer slices to the fridge for a few hours to thaw or leave at room temperature for about 30 minutes.
Reheating: If you prefer warm cake, gently heat slices in the microwave for 10-15 seconds, but be careful not to overheat, or the frosting may melt.
What to Serve with Andes Chocolate Mint Cake?
There’s nothing quite like bringing a vibrant dessert to the table to create a full meal experience that excites the senses.
-
Whipped Cream: A dollop of freshly whipped cream adds a light touch, balancing the cake’s rich, minty flavors while enhancing its visual appeal.
-
Vanilla Ice Cream: Creamy vanilla ice cream provides a delightful contrast; its coolness melds perfectly with the warm chocolate layers, delivering bliss in every bite.
Imagine the joyful harmony as you scoop together every spoonful, drawing out smiles from everyone. -
Fresh Berries: Juicy strawberries or raspberries offer a bright, tart contrast that cuts through the richness, refreshing the palate with each delightful bite.
-
Mint-Infused Tea: Enjoy a warm cup of mint-infused herbal tea for a soothing pairing; its herbal notes harmonize beautifully with the cake’s minty essence.
-
Chocolate Ganache: Drizzle a warm chocolate ganache over the top for an extra decadent touch. The rich chocolate flavor enhances the cake’s layers, making it even more indulgent.
-
Fruit Salad: A refreshing medley of seasonal fruits provides a vibrant splash of color to your dessert table, balancing the cake’s sweetness with a light, zesty touch.
Variations & Substitutions for Andes Chocolate Mint Cake
Get ready to personalize your Andes Chocolate Mint Cake! With a little creativity, you can elevate this delightful dessert into something truly unique.
-
Cupcakes: Transform the batter into 12 delightful cupcakes! Bake for 18-20 minutes for bite-sized indulgence.
-
Sheet Cake: Skip the layers and pour the batter into a 13×9-inch pan for an easy, crowd-pleasing sheet cake version. It’s perfect for parties and gatherings.
-
Frosting Twist: Swap the mint chocolate chip frosting for a cream cheese frosting for a tangy variation. This change adds a whole new level of depth—yum!
-
Mint Variations: Try using different mint candies like Junior Mints or peppermint patties instead of Andes for a fun twist on the filling. Each candy brings its own unique flavor profile.
-
Chocolate Swirl: For an extra indulgent touch, drizzle some chocolate ganache over the frosted cake. This addition enhances the chocolate flavor and creates an elegant presentation.
-
Healthier Option: Substitute half of the all-purpose flour with whole wheat flour for a slightly healthier version—still moist and delicious!
-
No Buttercream: If you prefer a lighter option, use whipped cream instead of buttercream for the frosting. Its light texture complements the rich cake beautifully.
-
Extra Crunch: Add finely chopped nuts or cookie crumbs (like Thin Mint crumbs!) to the batter for an added crunchy texture that contrasts nicely with the soft cake.
Explore these tasty variations and find your perfect combination. For more mouthwatering treat ideas, check out our recipes for Mint Chocolate Chip Protein Balls and Chocolate Peanut Butter Swirl Cookies. Happy baking!
Make Ahead Options
Preparing the Andes Chocolate Mint Cake in advance is a fantastic way to save time for busy weeknights and celebrations! You can bake the cake layers up to 3 days in advance; simply let them cool completely before wrapping each layer tightly in plastic wrap and refrigerating. For the frosting, it can be made up to 24 hours ahead as well—store it in an airtight container in the refrigerator to maintain its fluffy texture. When you’re ready to serve, allow the cake layers to come to room temperature while whisking the frosting gently before spreading. This way, you’ll have an indulgent dessert ready to impress without the last-minute rush!

Andes Chocolate Mint Cake Recipe FAQs
How do I choose the right ingredients for my Andes Chocolate Mint Cake?
Absolutely! For the best results, when selecting your ingredients, ensure that your flour is fresh and spooned for accuracy. Also, choose high-quality Dutch process cocoa powder for that rich chocolate flavor which really makes a difference! When picking Andes mints, opt for those that are in good condition, avoiding any that appear discolored or damaged.
What is the best way to store leftovers?
To keep your Andes Chocolate Mint Cake fresh, store it in an airtight container or cover it tightly with plastic wrap. It will stay delicious in the fridge for up to 5 days. If you want to save some for later, slice the cake, wrap each piece tightly in plastic, and place them in a freezer-safe container where they can last up to 30 days!
Can I freeze the Andes Chocolate Mint Cake?
Yes! Freezing is a great option. To freeze your cake, first, allow it to cool completely. Then, wrap individual slices tightly in plastic wrap and place them in a freezer-safe bag or container. When you’re ready to enjoy it, thaw the slices in the fridge for a few hours or let them sit at room temperature for about 30 minutes. Enjoy your cake just like fresh!
What should I do if my cake domes while baking?
Very common! If your Andes Chocolate Mint Cake domes while baking, you can level it off once it has cooled a bit. Use a serrated knife and gently slice off the top of the domed layer to make it even. This ensures that all layers can stack neatly without any tilting, making for a beautiful final presentation!
Are there any dietary concerns with Andes Chocolate Mint Cake?
Definitely! If you have guests with dietary restrictions, be aware of common allergens like eggs, dairy, and gluten in this cake. For a dairy-free version, you can replace buttermilk with a non-dairy option (like almond milk with a splash of vinegar), and use dairy-free chocolate for the frosting. It’s always a good idea to inform guests of any important ingredients used!
How long can I keep the cake in the freezer?
You can happily keep your Andes Chocolate Mint Cake in the freezer for up to 30 days. Make sure to use good quality wrapping to preserve its flavor and texture. If you thaw it properly, it will taste as fresh as the day you made it!
Andes Chocolate Mint Cake
Ingredients
Equipment
Method
- Preheat your oven to 350°F (175°C). Grease three 8-inch round cake pans with non-stick spray and line with parchment paper.
- In a large mixing bowl, sift together 2 cups of flour, ¾ cup of cocoa powder, 2 cups of sugar, 1 ½ teaspoons of baking powder, 1 ½ teaspoons of baking soda, and 1 teaspoon of salt.
- In another bowl, whisk together 1 cup of oil, 4 eggs, 1 cup of buttermilk, and 2 teaspoons of vanilla extract. Gradually stir in 1 cup of hot water.
- Slowly pour the wet ingredients into the dry ingredients and gently mix until just combined.
- Divide the batter among the prepared pans and bake for 24–27 minutes, checking for doneness with a toothpick.
- Allow the cakes to cool in the pans for about 10 minutes, then transfer to a wire rack to cool completely.
- For the frosting, beat 1 cup of butter until creamy, then add 4 cups of sifted powdered sugar, 1 teaspoon of peppermint extract, and 2–4 tablespoons of heavy cream.
- Assemble the cake by layering with frosting and chopped Andes mints between layers.
- Frost the entire cake and top with more Andes mints for decoration.
Leave a Reply